Last updated: February 19, 2026
Key Takeaways
• Container gardening lets you grow plants anywhere—balconies, patios, or small yards—without needing traditional garden beds
• Start with easy-to-grow plants like lettuce, herbs, and marigolds to build confidence before tackling more challenging varieties
• Choose containers at least 6-8 inches deep with drainage holes, and invest in quality potting mix designed for containers
• Most container plants need daily watering and weekly feeding during growing season
• Begin small with 3-5 containers to avoid overwhelm and learn proper care techniques
Quick Answer
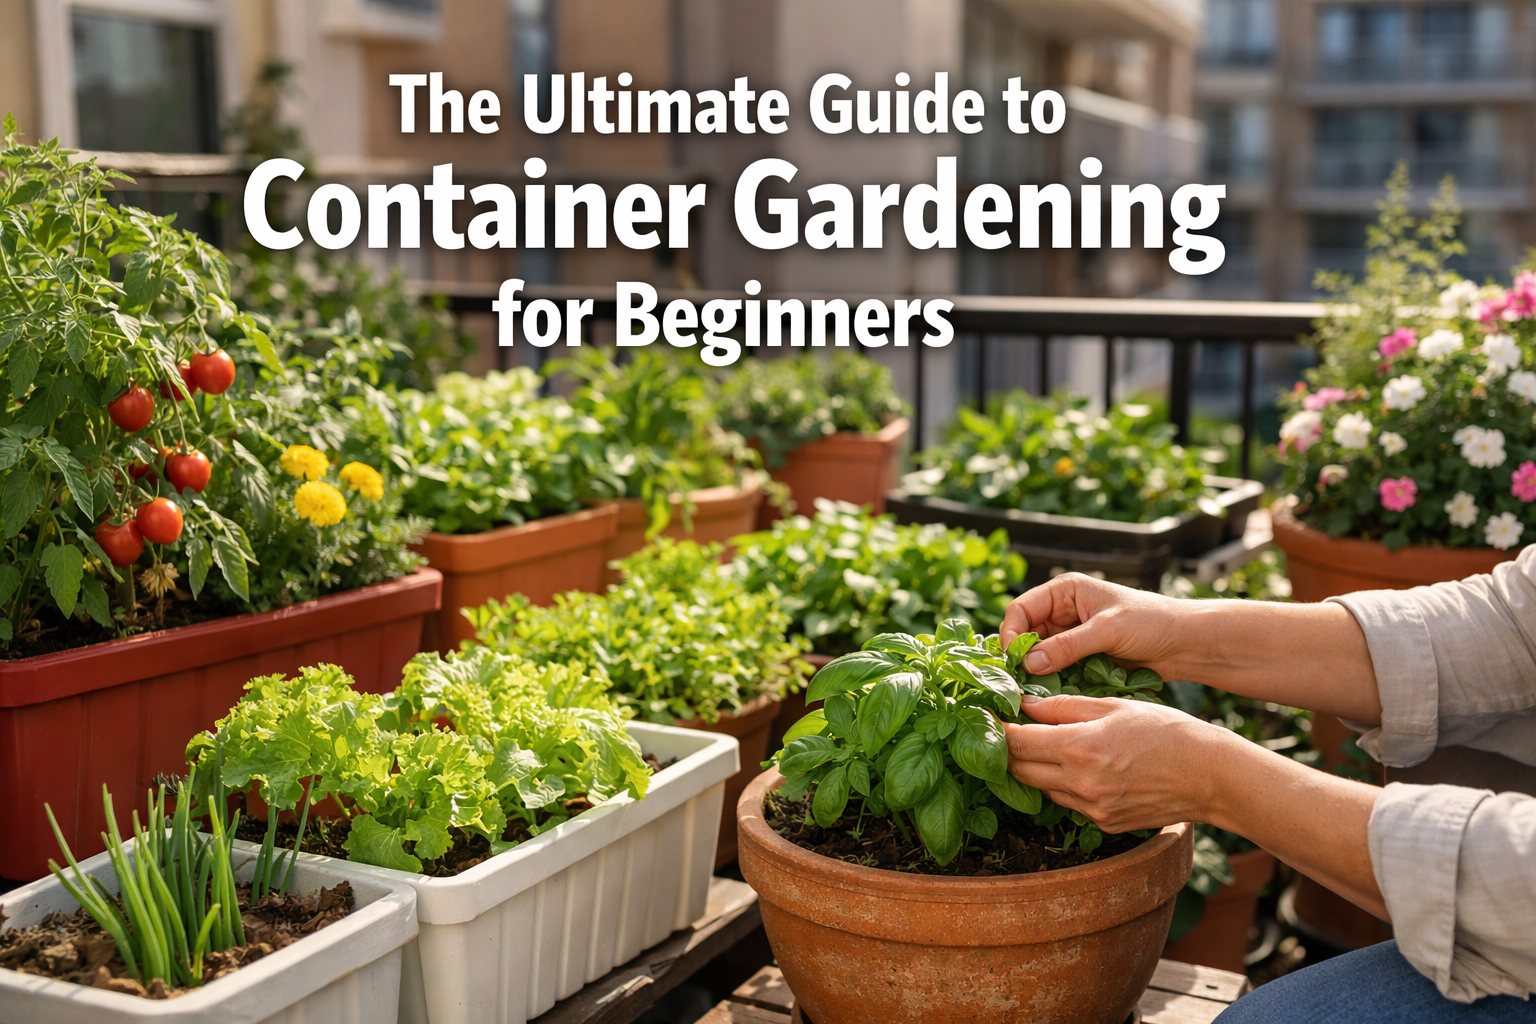
Container gardening for beginners is the practice of growing plants in pots, planters, or other containers instead of planting directly in the ground. It’s perfect for apartment dwellers, renters, or anyone with limited space who wants to grow their own food or beautiful flowers. You can start with just a few containers, some quality potting soil, and beginner-friendly plants like herbs or lettuce.
I remember staring at my tiny apartment balcony three years ago, feeling completely overwhelmed by all the gardening advice online. Everyone seemed to know exactly what they were doing except me. I’d just bought my first packet of basil seeds and had no clue where to start. If you’re feeling that same mix of excitement and terror right now, you’re in exactly the right place.
Container gardening for beginners isn’t just about growing plants—it’s about nurturing the love for the earth in whatever space you have. Whether you’ve got a sprawling backyard or just a sunny windowsill, I’ll walk you through everything you need to know to grow, learn, and flourish in your gardening journey.
What Is Container Gardening and Why Should Beginners Start Here?
Container gardening is simply growing plants in pots, planters, or any container instead of planting them directly in garden beds. For beginners, it’s the perfect way to dip your toes into gardening without the commitment or complexity of traditional in-ground gardens.
Here’s why I always recommend container gardening for beginners:
Complete control over your environment. You choose the soil, the location, and can even move plants if they’re not happy. No dealing with poor soil quality or permanent planting decisions you might regret later.
Start small and grow your confidence. Begin with just a few containers and add more as you learn. There’s no pressure to fill an entire garden bed or make major landscape decisions.
Perfect for renters and small spaces. You can take your garden with you when you move, and it works beautifully on balconies, patios, or even indoors near bright windows.
Easier maintenance and problem-solving. When you’re dealing with individual containers, it’s much easier to spot issues like pests or diseases and address them quickly.
Budget-friendly way to test your green thumb. You can start container gardening for under $50 and see if you enjoy it before investing in larger gardening projects.
Choose container gardening if you: rent your home, have limited outdoor space, want to start small, or prefer having control over every aspect of your plants’ environment. Stick with traditional gardening if you: own your home, have plenty of yard space, and want to grow large quantities of food or create permanent landscape features.
The beauty of container gardening is that it meets you where you are—literally and figuratively. You don’t need to transform your entire life to become a garden enthusiast.
Essential Container Gardening Supplies for Beginners
You don’t need to break the bank or buy every gadget you see online. After years of trial and error, here are the absolute essentials that will set you up for success in your container gardening journey.
Containers: Your Plants’ New Homes
Size matters more than you think. Most beginners choose containers that are too small. Here’s my rule of thumb:
- Herbs: 6-8 inch diameter, 6-8 inches deep
- Lettuce and greens: 8-12 inches wide, 6-8 inches deep
- Tomatoes: 18-24 inches diameter, 18+ inches deep
- Root vegetables: 12+ inches deep for carrots, 8+ inches for radishes
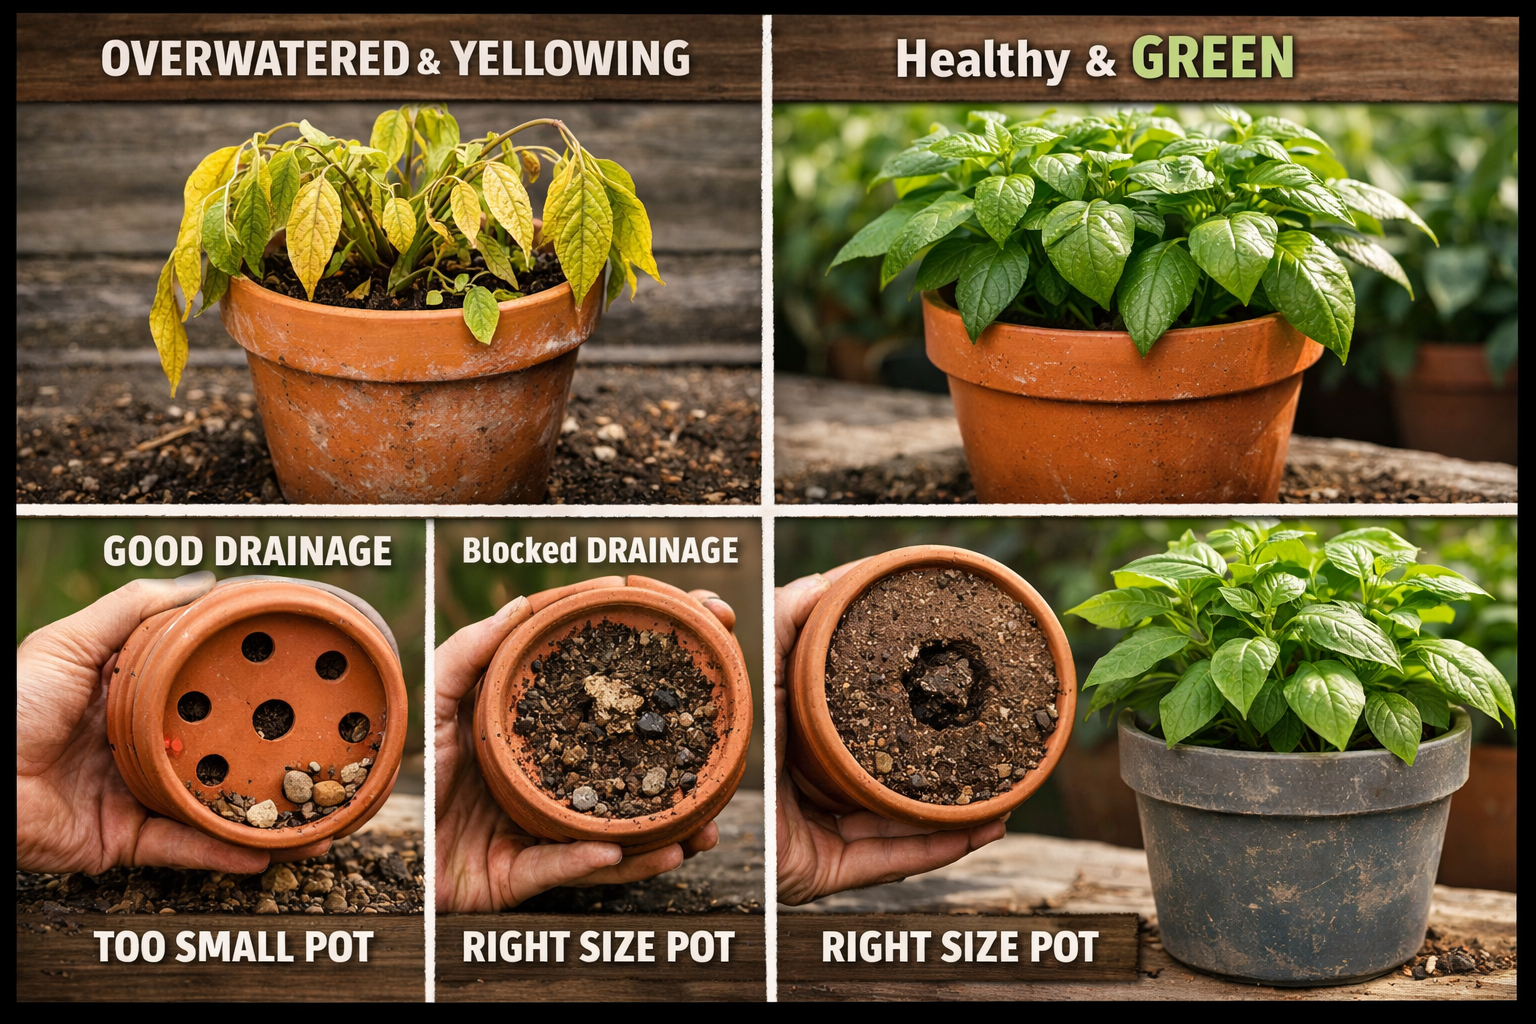
Drainage is non-negotiable. Every container needs holes in the bottom. If you fall in love with a pot without drainage, you can drill holes yourself or use it as a decorative outer pot with a plastic liner inside.
Material choices that work:
- Terracotta: Classic, breathable, but dries out faster
- Plastic: Lightweight, retains moisture, budget-friendly
- Fabric grow bags: Great drainage, root-friendly, easy storage
- Ceramic: Beautiful but heavy and can crack in freeze
Common mistake: Buying the prettiest pots instead of the most functional ones. Start with function, then upgrade to prettier options as you gain experience.
Soil: The Foundation of Success
Never use garden soil in containers. It’s too heavy and doesn’t drain well in pots. Always choose potting mix specifically designed for containers.
What to look for in quality potting mix:
- Contains perlite or vermiculite for drainage
- Includes compost or other organic matter
- Feels light and fluffy, not dense
- Says “potting mix” not “potting soil” on the bag
My favorite beginner-friendly approach: Buy a high-quality organic potting mix from a garden center rather than trying to make your own. Once you’re more experienced, you can experiment with custom soil mixes.
Basic Tools That Actually Matter
Start with these five tools:
- Small hand trowel – for planting and transplanting
- Watering can with a rose attachment – gentle watering that won’t disturb soil
- Small pruning shears – for harvesting and deadheading
- Measuring cup – for consistent watering and fertilizing
- Plant markers – trust me, you’ll forget what you planted where
Skip these until later: Expensive tool sets, electric gadgets, or anything that promises to “revolutionize” your gardening. Simple tools work best when you’re learning.
For a complete list of organic container gardening supplies that support sustainable living, check out our detailed guide that covers everything from eco-friendly fertilizers to natural pest control options.
Step-by-Step Guide to Container Gardening for Beginners
Let me walk you through setting up your first container garden. I’ll break this down into manageable steps so you won’t feel overwhelmed.
Step 1: Choose Your Location
Find a spot that gets 6+ hours of sunlight daily for vegetables and most herbs. If you only have shade, don’t worry—there are plenty of shade-loving plants for containers that will thrive.
Consider these practical factors:
- Access to water (you’ll be watering daily in summer)
- Protection from strong winds
- Weight limits if you’re on a balcony
- How much space you can realistically maintain
Test your light conditions by checking your space at different times throughout one full day. Morning sun counts differently than afternoon sun.
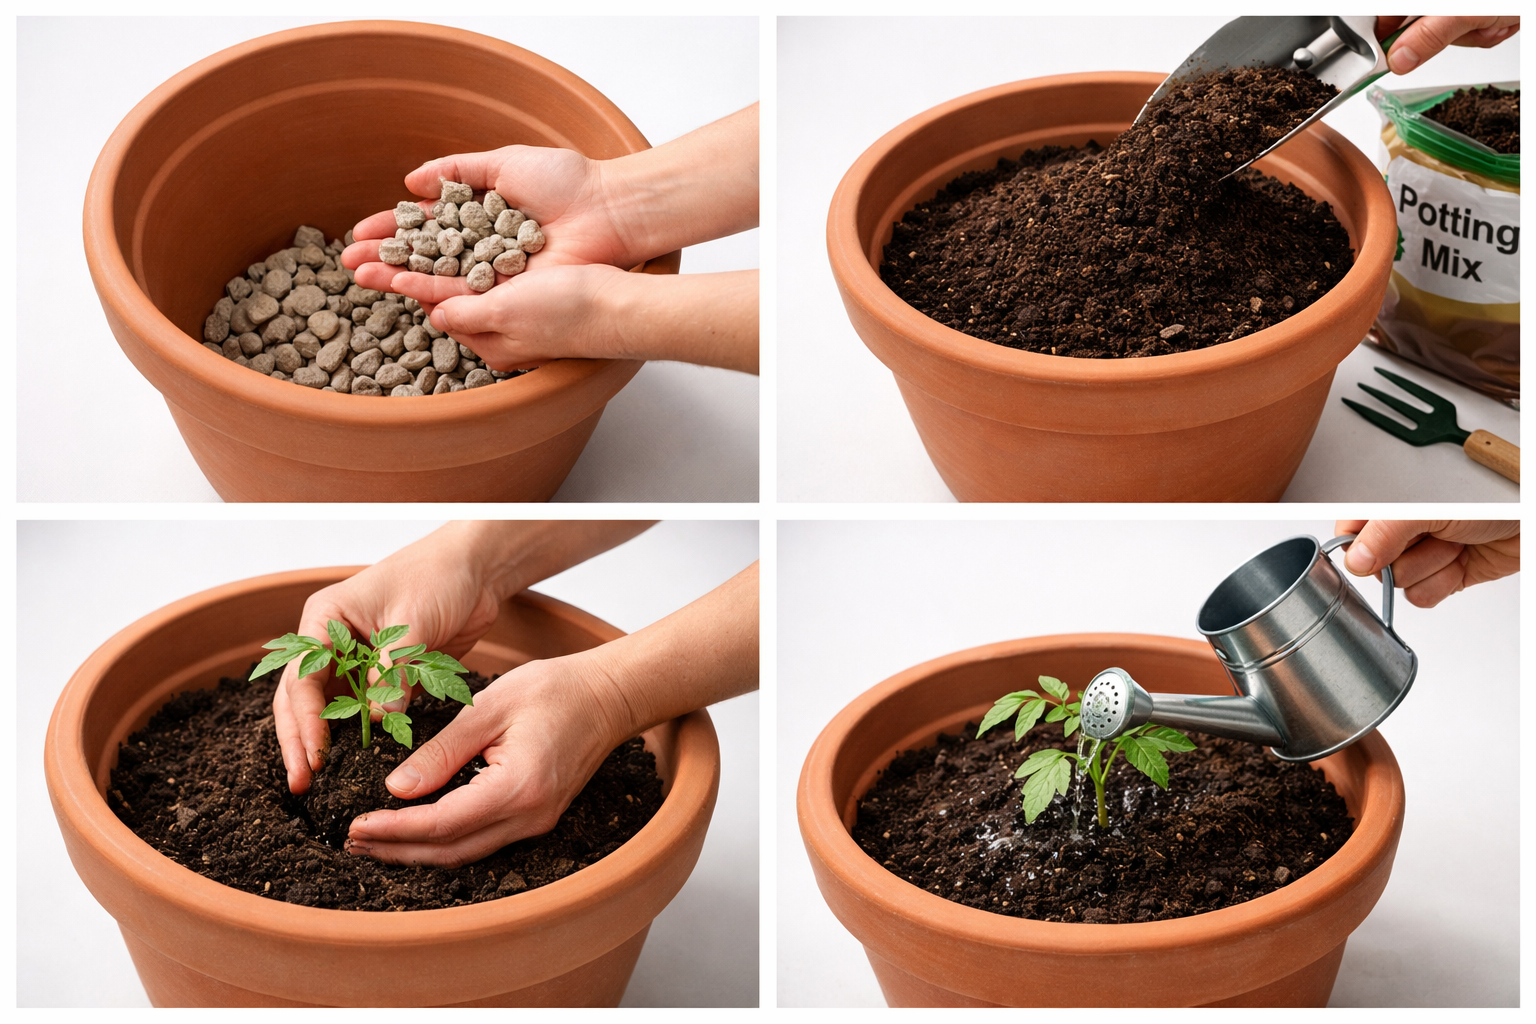
Step 2: Set Up Your Containers
Layer your container properly:
- Optional: Add a thin layer of gravel or broken pottery for extra drainage
- Fill with potting mix leaving 1-2 inches from the rim
- Water lightly to settle the soil
- Top off with more mix if needed
Pro tip: Wet your potting mix in a wheelbarrow or large tub before adding it to containers. Dry mix can be dusty and hard to wet evenly.
Step 3: Plant Your Seeds or Seedlings
For seeds: Follow the depth instructions on the packet—usually 2-3 times the seed’s diameter. Learning to decode seed packets will give you confidence in getting this right.
For seedlings: Dig a hole slightly larger than the root ball, gently remove the plant from its nursery pot, and place it at the same depth it was growing before.
Spacing matters: Don’t overcrowd! Plants need room for air circulation. When in doubt, plant fewer rather than more.
Step 4: Water and Wait
Water gently until you see water draining from the bottom. This ensures the entire root zone is moist.
Create a simple watering schedule:
- Check soil daily by sticking your finger 1 inch deep
- Water when the top inch feels dry
- Water in the morning when possible
Be patient with germination. Seeds can take anywhere from 3 days to 3 weeks to sprout, depending on the variety and conditions.
Choose this step-by-step approach if you: want clear guidance and prefer to follow a proven system. Modify the steps if you: have experience with houseplants or prefer to experiment as you learn.
The key is starting simple and building your skills gradually. Don’t try to master everything at once—focus on keeping your first few plants healthy and happy.
Best Plants for Container Gardening Beginners
Choosing the right plants can make or break your first container gardening experience. I learned this the hard way when I tried to grow watermelons in tiny pots (spoiler alert: it didn’t work).
Here are my tried-and-true recommendations for plants that are forgiving, fast-growing, and perfect for building your confidence.
Foolproof Herbs for New Gardeners
Basil is my number one recommendation for beginners. It grows quickly, smells amazing, and you’ll actually use it in cooking. Plant it after your last frost date and pinch flowers to keep leaves tender.
Mint grows so enthusiastically that experienced gardeners actually worry about it taking over. In containers, this vigor becomes a superpower for beginners. Just don’t plant different mint varieties in the same pot—they’ll cross-pollinate.
Chives are practically indestructible and come back year after year. They’re like the golden retriever of the herb world—friendly, reliable, and always happy to see you.
Parsley (flat-leaf is more flavorful than curly) grows steadily and tolerates some neglect. Plus, it’s a biennial, so it’ll keep producing for two years.
For a complete guide to growing herbs in containers, including spacing and care tips, check out our container herb gardening guide.
Easy Vegetables That Build Confidence
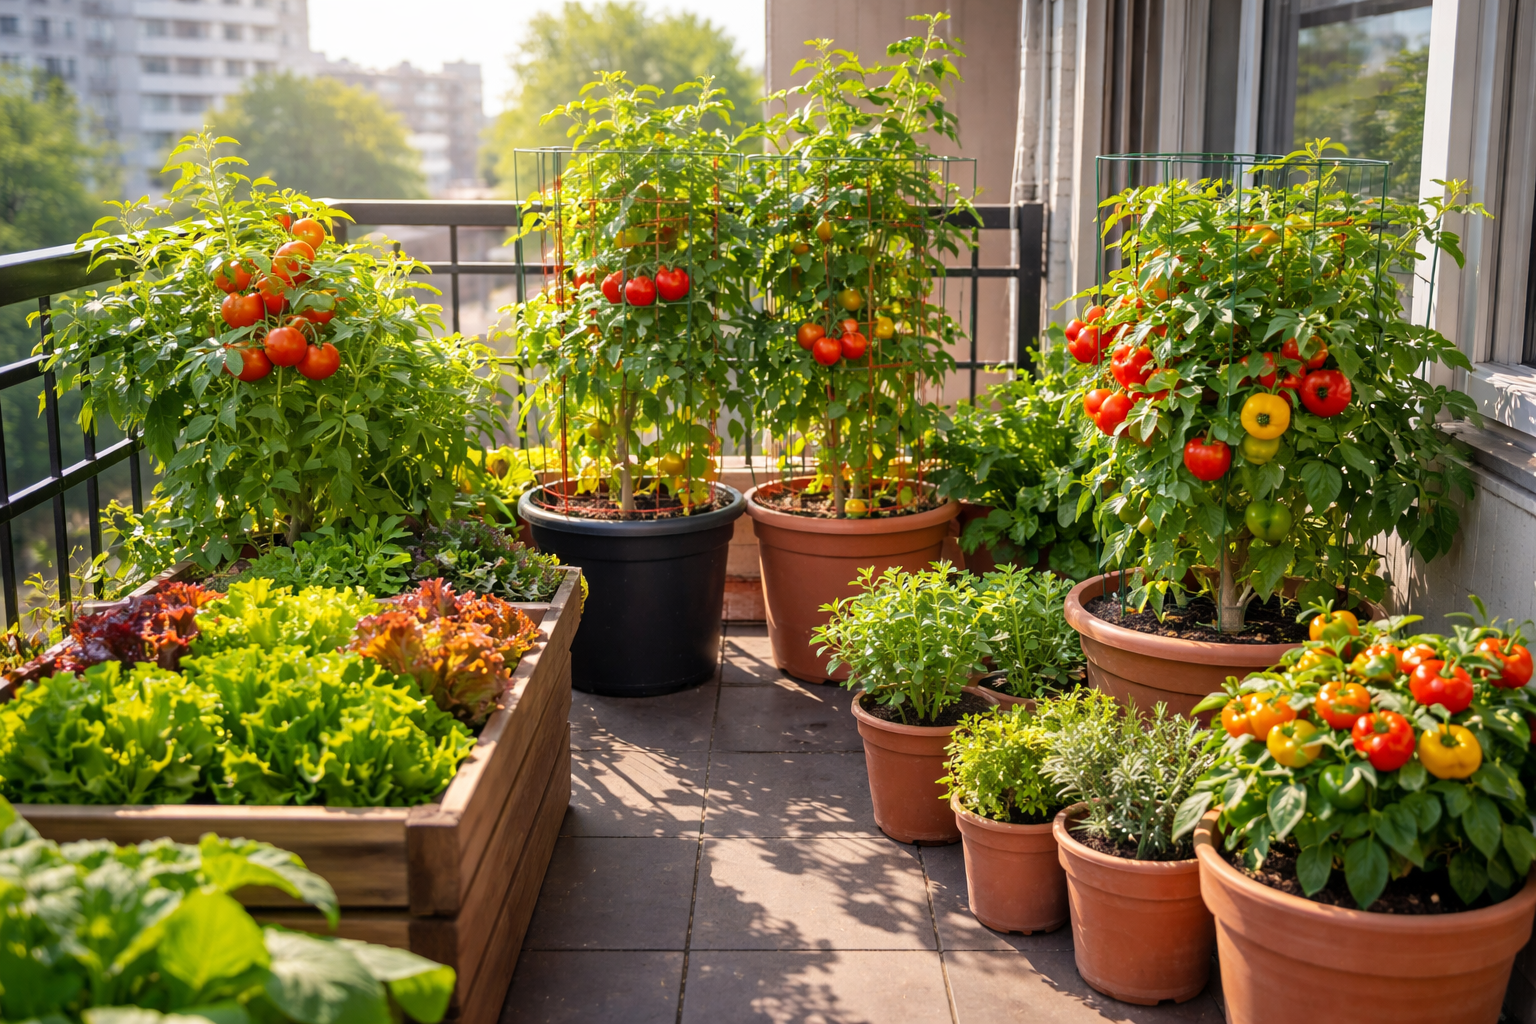
Lettuce and salad greens are perfect for beginners because they grow fast (ready in 30-45 days), don’t need deep containers, and you can harvest them multiple times. Try ‘Black Seeded Simpson’ or ‘Buttercrunch’ varieties.
Radishes are the speed demons of the vegetable world—ready to harvest in just 25-30 days. They’re also great for teaching kids about gardening because the gratification is so quick.
Bush beans don’t need support like pole beans, and they’ll keep producing for weeks. ‘Provider’ and ‘Contender’ are reliable varieties that handle heat well.
Cherry tomatoes are much easier than large tomatoes for beginners. Try ‘Sweet 100’ or ‘Stupice’ varieties. They do need larger containers (at least 18 inches diameter) and some support.
Peppers are heat-loving and relatively low-maintenance once established. Start with sweet varieties like ‘California Wonder’ bell peppers or ‘Shishito’ for something different.
Beautiful Flowers That Forgive Mistakes
Marigolds are like the cheerful best friend of the flower world. They bloom all season, tolerate heat and drought, and their bright colors make any container garden look intentional.
Zinnias come in every color imaginable and attract butterflies. They’re annuals that keep blooming until frost, and they’re excellent for cut flowers.
Nasturtiums have edible flowers (they taste peppery) and trailing varieties look beautiful cascading from containers. Plus, they actually prefer poor soil, so you can’t really overfeed them.
Sunflowers might seem too big for containers, but dwarf varieties like ‘Teddy Bear’ or ‘Pacino’ stay compact and bring pure joy to any space.
What to Avoid as a Beginner
Skip these until you have more experience:
- Large tomatoes (need extensive support and consistent care)
- Corn (needs too much space and cross-pollination)
- Melons and squash (sprawling and need huge containers)
- Orchids or other finicky houseplants (save these for when you’re more confident)
Common beginner mistake: Trying to grow everything you love to eat instead of starting with what’s easy to grow. Master the basics first, then expand to more challenging plants.
For specific guidance on vegetables that grow well in containers, including container size requirements and care instructions, our detailed guide covers everything from tomatoes to root vegetables.
Common Container Gardening Problems and Simple Solutions
Every gardener faces challenges, and container gardening has its own unique set of issues. The good news? Most problems have simple solutions once you know what to look for.
Watering Woes: Too Much or Too Little
Overwatering is actually more common than underwatering with new container gardeners. Signs include yellowing leaves, musty smell from soil, or fungus gnats flying around your pots.
Quick fixes for overwatering:
- Stop watering immediately and let soil dry out
- Check that drainage holes aren’t blocked
- Move containers to a spot with better air circulation
- Remove any standing water from saucers
Underwatering shows up as wilted leaves, dry soil pulling away from container edges, or plants that perk up immediately after watering.
Solutions for underwatering:
- Water slowly and deeply until water runs from drainage holes
- Add a layer of mulch to retain moisture
- Group containers together to create a humid microclimate
- Consider self-watering containers for plants that need consistent moisture
The finger test never fails: Stick your finger 1-2 inches into the soil. If it’s dry, water. If it’s moist, wait a day and check again.
Nutrient Deficiencies in Container Plants
Container plants need more frequent feeding than garden plants because nutrients wash out with regular watering. Yellow leaves (starting from the bottom) often signal nitrogen deficiency.
Simple feeding schedule for beginners:
- Use a balanced liquid fertilizer (like 10-10-10) every 2 weeks during growing season
- Dilute to half-strength—it’s better to feed lightly and often
- Stop feeding 6-8 weeks before your first expected frost
Organic options that work well:
- Compost tea (steep compost in water for 24 hours)
- Fish emulsion (smells terrible but plants love it)
- Worm castings mixed into potting soil
Pest Problems and Natural Solutions
Aphids are tiny green or black insects that cluster on new growth. Spray them off with water or use insecticidal soap.
Spider mites create fine webbing and stippled leaves. Increase humidity around plants and rinse leaves regularly.
Fungus gnats are tiny flies that hover around soil. Let soil dry out more between waterings and add a layer of sand on top to break their lifecycle.
Prevention beats treatment: Healthy plants resist pests better. Ensure good air circulation, don’t overcrowd containers, and inspect plants weekly.
When Plants Don’t Thrive
Leggy, weak growth usually means insufficient light. Move containers to a brighter location or accept that you need shade-tolerant plants.
Stunted growth often indicates the container is too small. Most vegetables and flowers need to be repotted into larger containers as they grow.
Poor flowering or fruiting can result from too much nitrogen (lots of leaves, no flowers) or inconsistent watering during flower formation.
Choose these solutions if you: want to troubleshoot problems yourself and learn through experience. Seek expert help if you: see widespread disease symptoms, have valuable plants at risk, or problems persist despite trying these fixes.
Common mistake: Assuming a struggling plant needs more water or fertilizer. Often, the solution is changing location, container size, or simply giving the plant more time to establish.
Remember, every gardener kills plants while learning. I’ve lost count of my plant casualties over the years, and each one taught me something valuable. The joy of nurturing nature comes from the learning process, not from perfection.
Seasonal Care and Maintenance Tips
Container gardening changes with the seasons, and understanding these rhythms will help you provide the best care for your plants year-round. Let me share what I’ve learned about keeping container gardens thriving through every season.
Spring: Starting Fresh
Spring is planting season for most vegetables and annual flowers. Start seeds indoors 6-8 weeks before your last frost date, or wait to plant outdoors until soil temperatures warm up.
Essential spring tasks:
- Replace or refresh potting soil in containers from last year
- Clean containers with a 10% bleach solution to prevent disease
- Start cool-season crops like lettuce, peas, and radishes first
- Wait until nighttime temperatures stay above 50°F for warm-season plants
Timing matters: Check your local last frost date and count backwards. Cool-season crops can handle light frost, but tomatoes and peppers will die if exposed to freezing temperatures.
Spring watering: Plants need less water in cool weather, but don’t let them dry out completely. Check soil every 2-3 days instead of daily.
Summer: Peak Growing Season
Summer means daily attention to your containers. Plants grow rapidly and use water quickly in hot weather.
Hot weather survival strategies:
- Water early morning or late evening to reduce evaporation
- Group containers together to create shade and retain humidity
- Use light-colored containers to reflect heat
- Add mulch on top of soil to conserve moisture
Harvest regularly to keep plants producing. Pick lettuce leaves, pinch herb stems, and harvest vegetables as soon as they’re ready.
Watch for heat stress: Wilted leaves during the hottest part of the day are normal, but plants should perk up by evening. Consistent wilting means more water or afternoon shade.
Fall: Extending the Season
Fall offers a second growing season for cool-weather crops. Plant lettuce, spinach, and radishes in late summer for fall harvest.
Preparing for winter:
- Gradually reduce watering as temperatures drop
- Harvest tender herbs like basil before the first frost
- Plant garlic cloves in containers for next year’s harvest
- Start thinking about which containers need winter protection
Fall cleanup: Remove spent annual plants and add them to compost. Clean empty containers and store them in a protected area if they might crack in freezing weather.
Winter: Rest and Planning
Most container gardens go dormant in winter, but that doesn’t mean there’s nothing to do. This is perfect planning time for next year’s garden.
Winter container care:
- Move tender perennial herbs indoors near a sunny window
- Protect containers from freeze-thaw cycles that can crack them
- Plan next year’s garden and order seeds early
- Start an indoor herb garden on a sunny windowsill
Cold protection for containers:
- Wrap pots in burlap or bubble wrap
- Move containers against a south-facing wall
- Group containers together for mutual protection
- Use frost cloth to protect plants during cold snaps
Winter growing options: Try growing microgreens, sprouts, or herbs indoors. Starting seeds indoors during winter gives you a head start on spring planting.
Plan seasonal care if you: want to maximize your harvest and keep plants healthy year-round. Keep it simple if you: prefer to focus on one growing season and start fresh each year.
Understanding seasonal rhythms helps you work with nature instead of against it. Each season offers unique opportunities to grow, learn, and flourish in your container gardening journey.
Frequently Asked Questions
How much does it cost to start container gardening?
You can start container gardening for $30-50 with basic containers, potting soil, and seeds. A small herb garden with 3-4 containers, quality potting mix, and herb plants costs around $40-60. Costs increase if you want larger containers for vegetables or premium organic supplies.
How often should I water container plants?
Check container plants daily during summer and water when the top inch of soil feels dry. Most containers need watering every 1-2 days in hot weather, every 2-3 days in moderate weather, and every 3-5 days in cool weather. Container plants dry out much faster than ground plants.
Can I use regular garden soil in containers?
Never use regular garden soil in containers. It’s too heavy, doesn’t drain well, and can contain pests or diseases. Always use potting mix specifically designed for containers, which contains ingredients like perlite for drainage and is sterilized to prevent problems.
What size container do I need for tomatoes?
Tomato plants need containers at least 18-20 inches in diameter and 18+ inches deep. Cherry tomato varieties can work in slightly smaller containers (15-16 inches), but larger tomatoes need the full space. Small containers lead to stunted growth and poor fruit production.
Do container plants need fertilizer?
Yes, container plants need regular fertilizing because nutrients wash out with frequent watering. Feed with balanced liquid fertilizer every 2 weeks during growing season, diluted to half strength. Slow-release granular fertilizers mixed into soil at planting also work well for beginners.
Can I grow vegetables in containers without a yard?
Absolutely! Container vegetable gardening works perfectly on balconies, patios, rooftops, or any space that gets 6+ hours of sunlight daily. Many vegetables actually grow better in containers than in ground because you control soil quality and drainage.
What’s the biggest mistake new container gardeners make?
The most common mistake is choosing containers that are too small. Plants become root-bound, dry out quickly, and produce poorly in undersized containers. Always choose larger containers than you think you need—your plants will thank you with better growth and harvests.
How do I know if my container has good drainage?
Good drainage means water flows freely from holes in the container bottom within a few minutes of watering. If water sits on the surface or drains very slowly, you need more or larger drainage holes. Every container must have drainage holes to prevent root rot.
Can I reuse potting soil from last year?
You can refresh and reuse potting soil by mixing in fresh compost and new potting mix (about 30-50% new material). Remove old plant roots and debris first. However, soil from diseased plants should be discarded, and completely fresh soil works best for optimal plant health.
When should I start container gardening?
Start cool-season crops like lettuce and herbs 2-4 weeks before your last frost date. Wait until nighttime temperatures stay above 50°F for warm-season plants like tomatoes and peppers. You can start planning and gathering supplies anytime, but timing plantings to your local climate is crucial.
Do I need special tools for container gardening?
Basic container gardening only requires a small hand trowel, watering can, and pruning shears. You don’t need expensive tools or gadgets. A measuring cup for consistent watering and plant markers to remember what you planted are also helpful for beginners.
How much sun do container vegetables need?
Most vegetables need 6-8 hours of direct sunlight daily for good production. Leafy greens like lettuce and spinach can tolerate 4-6 hours, while fruiting plants like tomatoes and peppers need the full 6-8 hours. Observe your space throughout the day to assess available light.
Key Takeaways
• Start small and simple with 3-5 containers, easy plants like herbs and lettuce, and basic supplies to build confidence before expanding your container garden
• Choose function over beauty when selecting containers—proper size and drainage matter more than appearance for plant health and your success as a beginner
• Master the watering routine by checking soil daily with the finger test and watering when the top inch feels dry, as container plants need more frequent watering than ground plants
• Feed your plants regularly with diluted liquid fertilizer every 2 weeks during growing season, since container plants need more nutrients than garden plants due to frequent watering
• Pick beginner-friendly plants like basil, lettuce, radishes, and marigolds that grow quickly and forgive mistakes while you’re learning proper care techniques
• Expect and learn from problems like overwatering, pests, or poor growth—every gardener faces these challenges and each one teaches valuable lessons
• Plan for seasonal changes by adjusting watering frequency, protecting plants from extreme weather, and choosing appropriate crops for each season
• Focus on soil quality by always using potting mix designed for containers rather than garden soil, and refresh it annually for best results
• Give plants adequate space by choosing larger containers than you think you need, as cramped roots lead to poor growth and frequent watering needs
• Enjoy the learning process and remember that container gardening is about nurturing your love for nature in whatever space you have, not achieving perfection
Conclusion
Container gardening for beginners isn’t just about growing plants—it’s about discovering the joy of nurturing nature in your own space, no matter how small. Whether you’re starting with a single herb pot on a windowsill or planning a full balcony vegetable garden, you now have the foundation to begin your gardening journey with confidence.
Remember, every expert gardener started exactly where you are now. I still remember the thrill of my first successful basil harvest and the disappointment of my first plant casualties. Both experiences taught me valuable lessons that made me a better gardener. The path to developing your green thumb is paved with small experiments, gentle failures, and wonderful successes.
Your next steps are simple: Choose 2-3 containers and fill them with quality potting mix. Pick one herb, one easy vegetable, and one flower from my beginner recommendations. Set up your containers in the sunniest spot you have available. Water when the soil feels dry, feed every two weeks, and observe your plants daily.
Most importantly, be patient with yourself and your plants. Gardening is a practice of sustainable living that connects us to natural rhythms and teaches us to slow down. Every seed you plant is a step toward creating your own green paradise, no matter how modest.
The gardening wisdom you’ll gain from your first container garden will serve you for years to come. Whether you eventually expand to raised beds, try organic container gardening, or stick with simple container setups, you’re building skills and confidence that will help you grow, learn, and flourish.
Start today, start small, and trust the process. Your future self—and your future harvests—will thank you for taking this first step into the wonderful world of container gardening.

0 Comments