
Your Cozy Corner of Green: Building the Perfect Seed Starting Station at Home 🌱
There’s a special kind of magic that happens when you hold a tiny seed in your hand. It might look small and unassuming, but inside, it holds the blueprint for a vibrant plant, ready to burst forth with life. For me, Emma Sage, that feeling is pure joy. It’s the promise of delicious homegrown tomatoes, fragrant herbs, or a burst of colorful flowers, all starting from a humble beginning. How do you make a perfect seed starting station at home?
Have you ever dreamed of growing your own garden, but felt like you needed a huge backyard or a green thumb handed down through generations? Well, I’m here to tell you that’s simply not true! You can create a thriving garden right inside your home, starting with a cozy seed starting station. It’s a wonderful way to connect with nature, save some money, and enjoy the freshest produce or most beautiful blooms you’ve ever seen. Plus, there’s something incredibly rewarding about watching those first tiny leaves unfurl. Let’s make that dream a reality together!
Key Takeaways
- Why Start Seeds Indoors? Starting seeds at home gives you more plant choices, saves money, and lets you get a head start on the growing season, all while experiencing the joy of nurturing life from scratch.
- Essential Gear: You’ll need seed starting trays, a special seed starting mix, a reliable light source (like grow lights), and tools for gentle watering to give your young plants the best start.
- Finding Your Spot: Pick a warm, draft-free place with easy access to your supplies. Even a small shelf or a corner of a room can become a bustling little plant nursery.
- Care and Nurturing: Young seedlings need consistent light, proper watering (not too much, not too little!), good air flow, and eventually, a gentle feeding to grow strong and healthy.
- Sustainable Practices: Embrace eco-friendly choices by reusing containers, making your own seed starting mix, and composting any plant waste to nurture the earth as you nurture your plants.
Why Start Seeds at Home? The Magic of Nurturing Life
Before we dive into the “how-to,” let’s chat about why starting seeds at home is such a wonderful adventure. I remember my very first attempt. I was living in a small apartment, longing for fresh basil and juicy cherry tomatoes. Store-bought seedlings were expensive, and the choices were limited. So, I bought a few packets of seeds, some tiny pots, and set them up on a sunny windowsill. The day I saw those first two little leaves, called cotyledons, push through the soil, I felt a surge of excitement! It was like a secret world was unfolding right before my eyes. 🤩
There are so many fantastic reasons to start your own seeds:
- More Choices: When you buy seeds, you open up a whole universe of plant varieties that you’d never find at your local garden store. Want a purple carrot? A striped tomato? A unique heirloom flower? Seeds make it possible!
- Save Money: A packet of seeds often costs less than a single plant from a nursery. With one packet, you can grow dozens of plants, saving you a lot of cash, especially if you plan a larger garden.
- Get a Head Start: Many plants need a long growing season that our local climate might not provide. Starting seeds indoors gives them a crucial head start, meaning you can harvest earlier and longer.
- Healthier Plants: You control the environment! You can give your seedlings the best possible start, with good soil, proper light, and gentle care, leading to stronger, more robust plants.
- Sustainable Living: It’s an eco-friendly choice! You reduce your carbon footprint by not relying on plants shipped from far away. Plus, you can reuse containers and make your own soil mixes, embracing truly organic container gardening supplies.
- The Joy of Nurturing: Honestly, it’s one of the most rewarding parts of gardening. Watching a tiny seed transform into a vibrant plant under your care is an incredible experience. It connects you deeply to the natural world and the cycle of life.
“There’s a deep joy in watching life unfurl, leaf by tiny leaf, knowing you’ve nurtured that growth from a tiny seed.”
Choosing Your Cozy Corner: Finding the Perfect Spot
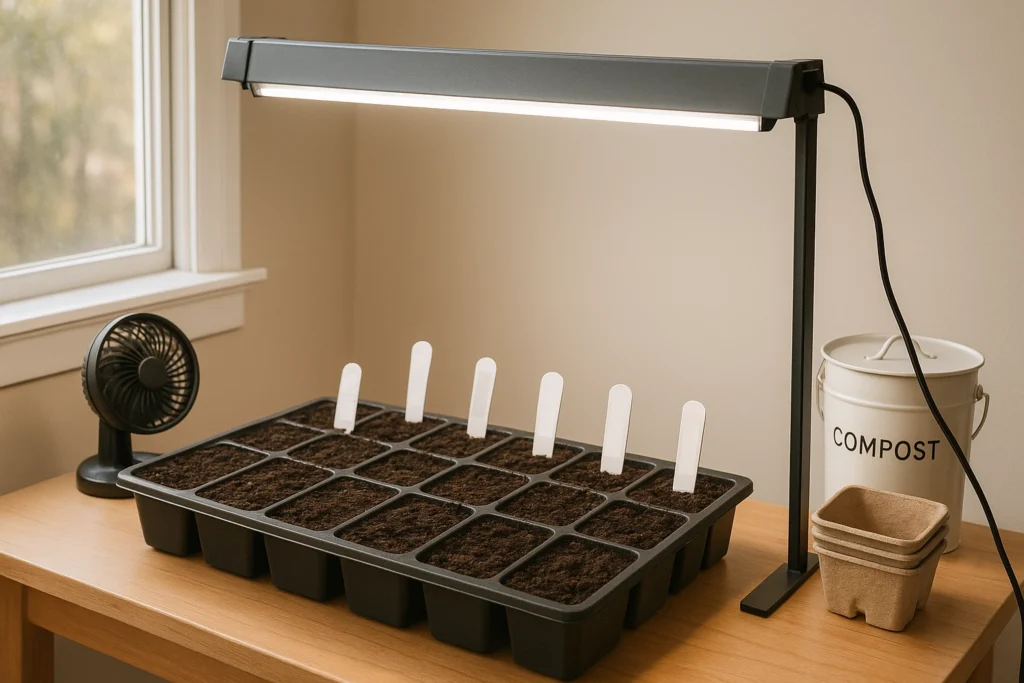
Your seed starting station doesn’t need to be fancy or huge. It just needs to meet a few basic needs for your future plant babies. Think of it as creating a nursery for your tiny green friends.
When I first started, my “station” was a rickety card table in a spare bedroom. It wasn’t pretty, but it worked! Over the years, I’ve learned that the key is finding a spot that’s warm, bright, and easy for you to access.
Here’s what to look for:
- Light: This is crucial! Seedlings need a lot of light to grow strong, not leggy and weak. Natural light from a south-facing window can work, but for consistent, strong growth, grow lights are usually best. We’ll talk more about those soon.
- Temperature: Most seeds like it cozy, around 65-75°F (18-24°C) to sprout. Once they sprout, they can handle slightly cooler temperatures, but still prefer warmth. Avoid drafty areas or spots that get very cold at night.
- Accessibility: You’ll be checking on your seedlings daily, watering them, and making adjustments. Choose a spot where you can easily reach everything without having to move a ton of stuff.
- Water Source: Having water nearby is super helpful. Hauling a watering can across the house gets old fast!
- Cleanliness: While gardening is inherently a bit messy, try to keep your seed starting area relatively clean. This helps prevent diseases and pests from bothering your young plants.
- Space: Consider how many plants you want to grow. A small shelf might be perfect for a few herbs, while a dedicated shelving unit with multiple light fixtures will let you grow a mini jungle!
Here’s a quick guide to help you pick your spot:
| Good Spot Characteristics | Not-So-Good Spot Characteristics |
|---|---|
| ✨ Bright: Near a south-facing window (supplemented with grow lights) or dedicated grow light setup. | 🚫 Dark: A north-facing window or a corner far from light. |
| 🌡️ Warm: Consistent room temperature (65-75°F), away from drafts. | 🥶 Cold/Drafty: Near an exterior door, cold window, or air vent. |
| 💧 Accessible: Easy to reach for daily watering and checking. | 🧗♀️ Hard to Reach: High shelves or cramped spaces. |
| 🧹 Clean: Relatively tidy to prevent pests and diseases. | 🐜 Messy/Cluttered: Attracts pests and makes tasks harder. |
| 🔌 Power Outlet: Essential for grow lights and heat mats. | 🚫 No Power: Limits your ability to use essential tools. |
Essential Gear for Your Seed Starting Adventure
Alright, let’s talk tools! Don’t worry, you don’t need to break the bank or buy every gadget out there. We’re aiming for practical and effective. Think of these as your building blocks for a successful seed starting station.
1. Containers: Homes for Your Tiny Seeds 🏡
You have so many choices here, and many can be reused!
- Seed Starting Trays: These are often plastic trays with individual cells, sometimes coming with a clear dome to help keep humidity high. They’re designed specifically for starting seeds and are very popular.
- Pros: Easy to organize, many cells, domes help with humidity.
- Cons: Can be flimsy, plastic waste if not reused.
- Peat Pots or Coir Pellets: These are made from compressed peat or coir (coconut fiber). You plant the seed in them, and then plant the whole pot directly into the garden later.
- Pros: Less transplant shock, eco-friendly options available.
- Cons: Can dry out quickly, peat is not always a sustainable choice (look for coir!).
- Soil Blocks: This is a super sustainable option! You use a special tool to press moistened seed starting mix into blocks. No plastic pots needed!
- Pros: Eco-friendly, excellent root development, no plastic waste.
- Cons: Requires a special tool, can dry out quicker than plastic pots.
- Recycled Containers: Get creative! Yogurt cups (poke drainage holes!), milk jugs cut in half, toilet paper rolls (great for tap-rooted plants like carrots!), or old plastic clamshell containers from berries. Just make sure they’re clean and have drainage holes.
- Pros: Free, sustainable, reduces waste.
- Cons: May not be as sturdy, can be harder to organize.
I love using old berry containers because the clear lid acts as a mini greenhouse! Just remember to poke some holes for air.
2. Seed Starting Mix: The Perfect Bed for Babies 🛌
This isn’t just regular potting soil! Seed starting mix is special because:
- It’s Fine and Light: It allows tiny roots to grow easily and helps with drainage.
- It’s Sterile: It’s usually free of weed seeds, diseases, and pests that can harm delicate seedlings.
- It Holds Moisture: It’s designed to stay moist without becoming waterlogged.
Look for an organic seed starting mix that contains ingredients like peat moss (or sustainable alternatives like coir), perlite, and vermiculite. Avoid heavy garden soil or regular potting mix, as they can be too dense and might contain pathogens that harm young plants. If you want to learn more about choosing the right foundation for your plants, check out my guide on the best organic soil for container gardening.
3. Light Source: The Sun’s Best Friend Indoors ☀️💡
This is arguably the most important piece of equipment after the seeds themselves. Natural light through a window is often not enough, especially in winter or early spring, leading to “leggy” (tall, thin, weak) seedlings.
- Fluorescent Grow Lights (T5 or T8): These are a great affordable option for beginners. They provide good light spectrum and intensity for seedlings.
- Setup: Hang them a few inches above your seedlings, and adjust as they grow.
- LED Grow Lights: While a bit more of an investment upfront, LEDs are energy-efficient, last a long time, and offer a full spectrum of light that’s excellent for plant growth.
- Setup: Follow manufacturer’s instructions for hanging height, as they can be more intense than fluorescents.
- Simple Shop Lights: You can even use basic fluorescent shop lights with “cool white” bulbs for a budget-friendly option. Just make sure they are very close to your plants.
Remember, consistent light for 12-16 hours a day is key! I use a simple timer to make sure my lights turn on and off automatically.
4. Heat Mats: A Warm Welcome for Seeds 🔥
Many seeds germinate best with a bit of bottom heat. A seedling heat mat gently warms the soil, encouraging quicker and more even sprouting.
- When to Use: Great for seeds that need warmth to germinate (like peppers, tomatoes, eggplants).
- When to Stop: Remove the mat once most of your seeds have sprouted. Seedlings usually prefer slightly cooler temperatures after germination.
5. Labels & Markers: Don’t Forget What You Planted! 🏷️
Trust me on this one – you will forget what you planted where! I’ve had many surprises at transplanting time because I skipped this step.
- Plastic Labels: Reusable and easy to write on with a permanent marker.
- Wooden Craft Sticks: Eco-friendly and biodegradable.
- DIY Labels: Cut up old plastic containers, yogurt lids, or even use rocks and a paint pen.
Always label with the plant name and the date you sowed the seeds.
6. Watering Tools: Gentle Drops for Delicate Sprouts 💧
Young seedlings are fragile and can easily be dislodged or drowned by a strong stream of water.
- Spray Bottle: For very young sprouts, a gentle mist can keep the soil moist without disturbing them.
- Small Watering Can with a Fine Rose: The “rose” attachment breaks the water into gentle sprinkles.
- Bottom Watering: This is my favorite method! Place your seed trays in a larger tray filled with an inch or so of water. The soil will soak up the water from the bottom, encouraging roots to grow downwards. Remove the trays once the top of the soil looks damp.
7. Fan: A Breeze for Strong Stems 💨
A small oscillating fan isn’t just for cooling you down! Running a fan on low for a few hours a day helps:
- Strengthen Stems: The gentle breeze makes seedlings sway, mimicking outdoor conditions and encouraging them to grow stronger, thicker stems.
- Prevent Disease: Good air circulation helps prevent “damping off,” a common fungal disease that can kill young seedlings.
Setting Up Your Seed Starting Station: Step-by-Step
Now that you have your gear, let’s put it all together! This is where your cozy corner truly comes to life.
- Choose Your Surface: Whether it’s a shelf, a table, or a dedicated rack, make sure it’s sturdy and can handle a bit of moisture. I like to put down an old towel or a plastic tarp to protect surfaces from spills.
- Assemble Shelving (if using): If you’re using a multi-tier shelving unit, get it set up. This is great for maximizing vertical space.
- Position Your Lights: Hang your grow lights above where your seedlings will sit. Make sure they are easily adjustable. You’ll want them just a few inches above the tops of your seedlings when they first sprout.
- Add Heat Mats: If you’re using heat mats, place them on the surface where your seed trays will go. Plug them into an outlet, ideally one connected to a timer if you want to control their on/off cycle.
- Organize Your Supplies: Keep your seed packets, labels, markers, and watering can close by. A small bin or caddy can help keep everything tidy.
- Test Everything: Before you plant, plug in your lights and heat mats to make sure they’re working. Set your timer for the lights. This helps you catch any issues before your precious seeds are in the soil.
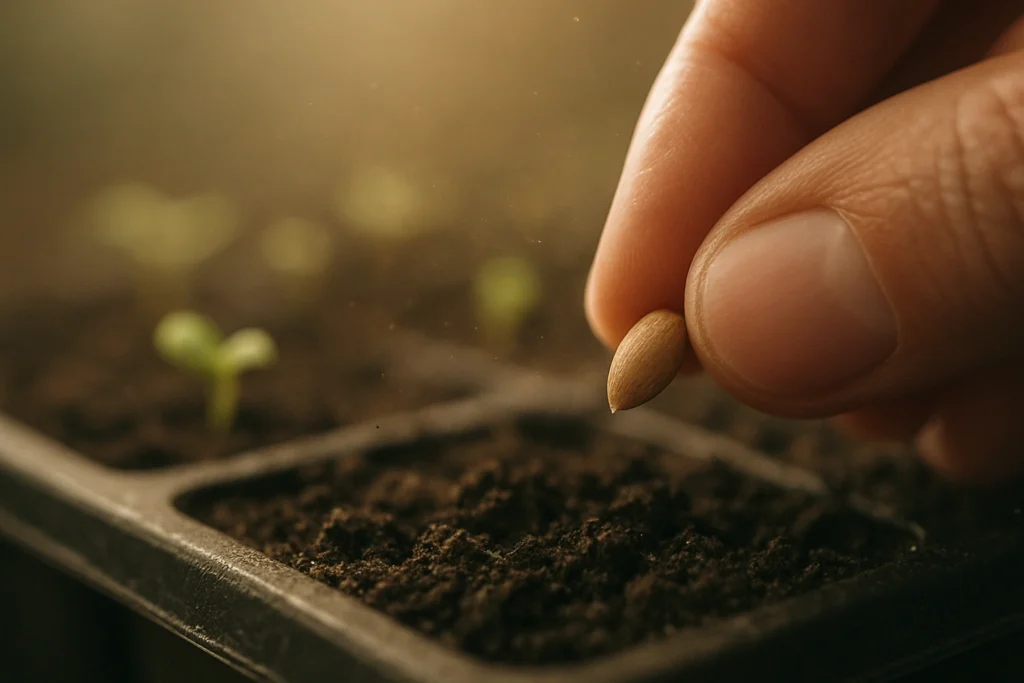
The Art of Sowing Seeds: Getting Them Started Right
This is the moment of truth! Sowing seeds is a simple process, but a little care goes a long way.
- Read Your Seed Packets: This is my golden rule! Every seed packet is a treasure trove of information. It tells you:
- Planting Depth: How deep to bury the seed.
- Spacing: How far apart to plant them.
- Germination Time: How long it takes for them to sprout.
- Light Requirements: Do they need light to sprout (surface sow) or darkness?
- Temperature: Ideal soil temperature for germination.
- Days to Maturity: How long until you can harvest.
- Pre-moisten Your Seed Starting Mix: Put your seed starting mix in a large bowl or bucket. Slowly add warm water and mix it until it’s consistently damp, like a wrung-out sponge. It should hold together when squeezed but not drip water. This prevents seeds from being washed away and ensures good contact with moisture.
- Fill Your Containers: Fill your chosen containers with the pre-moistened mix, gently tamping it down to remove large air pockets. Leave about a half-inch of space from the top. You can use seed starting containers.
- Sow Your Seeds:
- Small Seeds: Sprinkle tiny seeds (like lettuce or carrots) thinly over the surface. If they need light to germinate, don’t cover them. If they need darkness, sprinkle a very thin layer of mix over them.
- Larger Seeds: Create a small hole with your finger or a pencil according to the planting depth on the packet. Drop 1-2 seeds into each hole (planting a couple gives you a backup if one doesn’t sprout). Gently cover them with soil.
- Spacing: If you’re using open trays, space seeds according to the packet. If using individual cells, one or two seeds per cell is usually plenty.
- Gentle Watering (Again!): After sowing, give your containers another gentle misting with a spray bottle or water from the bottom.
- Label Everything! Immediately label each container or row with the plant name and the date you planted. You’ll thank me later. 😉
- Cover and Warm: If your containers came with a clear dome, put it on. This helps keep moisture and warmth in. If not, you can use plastic wrap or a clear plastic bag. Place your trays on the heat mat (if using) and under the grow lights.
“Every tiny seed holds the promise of a green paradise, waiting for your gentle touch to awaken its potential.”
Nurturing Your Little Ones: Care and Maintenance
Once your seeds are sown, the real fun (and a bit of patience!) begins. This is where you become the ultimate plant parent, nurturing the love for the earth right in your home.
Watering Wisely: Not Too Much, Not Too Little! 💧
This is one of the trickiest parts for new seed starters. Overwatering is a common killer of young seedlings.
- Check Daily: Feel the soil surface. If it feels dry, it’s time to water.
- Bottom Watering is Best: As mentioned before, place trays in a shallow pan of water for 15-30 minutes. Let the soil soak up what it needs. This encourages roots to grow downwards and helps prevent fungal issues.
- Gentle Top Watering: If you must water from the top, use a spray bottle or a watering can with a fine rose to avoid disturbing the seedlings.
- Drainage is Key: Never let your seedlings sit in standing water. Always ensure excess water can drain away.
Providing Light: Fuel for Growth 💡
As soon as your seeds sprout, they need light!
- Light Duration: Aim for 12-16 hours of light per day. Use a timer for consistency.
- Light Distance: Keep your grow lights just 2-4 inches above the tops of your seedlings. As they grow, raise the lights. This close proximity is essential to prevent “legginess.” If they’re too far away, seedlings stretch, desperately reaching for light, becoming weak and floppy.
Temperature & Humidity: The Ideal Climate 🌡️
- Post-Germination Temperature: Once seeds have sprouted, most seedlings prefer slightly cooler temperatures than germination, around 60-70°F (15-21°C). This encourages strong, compact growth.
- Humidity: The clear domes you used for germination can be removed once most seeds have sprouted. A little humidity is good, but too much can lead to damping off. Good air circulation is more important now.
Air Circulation: A Gentle Breeze 🌬️
Remember that fan? Now’s its time to shine!
- Run a small fan on a low setting for a few hours each day. This strengthens stems and prevents stagnant air, which can lead to fungal problems like damping off. Just don’t blast them with a strong wind!
Feeding Your Seedlings: A Little Boost 🌱
Seed starting mix usually doesn’t have many nutrients. Your seedlings will need a little food once they’ve developed their “true leaves” (the second set of leaves that look like the adult plant’s leaves, not the first round, which are called cotyledons).
- Start Weak: Use a very diluted liquid organic fertilizer (at half or quarter strength).
- Frequency: Feed them every 1-2 weeks.
- Organic Options: Look for gentle organic options like fish emulsion or a balanced organic liquid feed. If you’re curious about the best options, I’ve got a great guide on organic fertilizer for container plants.
Thinning: Making Space for the Strongest 💪
If you planted multiple seeds per cell or sprinkled them thickly, you’ll likely have more sprouts than you need. This is where thinning comes in.
- Why Thin? It ensures the strongest seedling gets all the resources (light, water, nutrients) it needs to thrive.
- How to Thin: Once seedlings have their first set of true leaves, choose the strongest, healthiest-looking seedling in each cluster. Use small scissors to snip the weaker ones at the soil line. Don’t pull them out, as this can disturb the roots of the one you want to keep. It might feel a little sad, but it’s crucial for strong plants!
Hardening Off: Preparing for the Great Outdoors
Your seedlings have lived a pampered life indoors. They’re like little hothouse flowers! Moving them straight outside into direct sun, wind, and fluctuating temperatures would be a shock. This is where “hardening off” comes in – a gentle transition to prepare them for their new home.
This process usually takes 7-14 days.
- Start Small: On the first day, pick a warm, calm day and place your seedlings in a shaded, sheltered spot outdoors for just 1-2 hours.
- Increase Exposure: Each day, gradually increase the amount of time they spend outside and slowly expose them to more sunlight and wind.
- Day 1-2: 1-2 hours in full shade.
- Day 3-4: 2-4 hours in partial shade.
- Day 5-6: 4-6 hours in dappled sun/partial sun.
- Day 7-10: 6-8 hours in full sun (but bring them in if temperatures drop significantly or there’s a harsh storm).
- Day 11-14: Leave them out overnight if temperatures are consistently above 50°F (10°C) and there’s no frost risk.
- Watch the Weather: Always check the forecast! Bring your seedlings inside if there’s a risk of frost, strong winds, or heavy rain.
- Keep Them Watered: Seedlings will dry out faster outdoors, so check their soil regularly.
After this hardening-off period, your seedlings will be strong, resilient, and ready to be transplanted into your garden beds or larger containers!
Troubleshooting Common Seed Starting Challenges
Even experienced gardeners run into issues sometimes! Here are a few common problems and how to fix them:
- Leggy Seedlings: This is probably the most common issue. Your seedlings are tall, thin, and floppy, reaching for light.
- Cause: Not enough light, or lights are too far away.
- Fix: Move your grow lights closer (2-4 inches above the plant tops). Ensure they get 12-16 hours of light daily. Next time, make sure your light setup is optimized from day one.
- Damping Off: Seedlings suddenly wilt and fall over, often with a pinched stem at the soil line. It’s a fungal disease.
- Cause: Overwatering, poor air circulation, unsterile soil or containers, cold temperatures.
- Fix: Unfortunately, affected seedlings usually can’t be saved. Remove diseased plants immediately. To prevent it, ensure good air circulation (use a fan!), avoid overwatering, use sterile seed starting mix, and clean your containers well.
- Slow Germination or No Germination: Seeds aren’t sprouting, or it’s taking much longer than expected.
- Cause: Old seeds, incorrect planting depth, too cold, too dry, or seeds need special treatment (like stratification or scarification).
- Fix: Check seed packet for ideal temperature and depth. Ensure soil is consistently moist. If seeds are old, they might just not be viable. For some stubborn seeds, research their specific needs.
- Yellowing Leaves: Lower leaves turn yellow.
- Cause: Lack of nutrients (especially nitrogen), overwatering, or sometimes cold temperatures.
- Fix: Once true leaves appear, start feeding with a diluted organic liquid fertilizer. Check your watering habits.
What to Grow in Your Cozy Station: Ideas for Every Gardener
The world is your oyster when it comes to seed starting! You can grow almost anything, but some plants are particularly rewarding or beneficial to start indoors.
Vegetables 🥕🍅🌶️
Starting your own veggies means you can enjoy fresh, flavorful produce and try unique varieties.
- Tomatoes & Peppers: These need a long growing season and love warmth, making them perfect candidates for indoor starting.
- Eggplants: Similar to tomatoes and peppers, they thrive with an early start.
- Broccoli, Cabbage, Kale: These “cole crops” can be started indoors and transplanted out as soon as the weather allows.
- Lettuce & Spinach: Quick growers, great for successive planting.
- Onions & Leeks: They take a long time to mature, so an indoor start is ideal.
For more ideas on what thrives in smaller spaces, check out my article on vegetables that grow well in containers.
Herbs 🌿
Fresh herbs are a game-changer for cooking, and they’re often easy to start from seed.
- Basil: Loves warmth and light, sprouts quickly.
- Parsley: Can be slow to germinate but grows into a lush plant.
- Cilantro: A quick grower, but can bolt (go to seed) in hot weather.
- Chives: Easy to grow from seed and perennial.
- Oregano & Thyme: Slower growers but very rewarding.
Discover more fragrant choices in my post about herbs for container gardening.
Flowers 🌸🌼🌻
Add beauty and attract pollinators to your garden!
- Marigolds & Zinnias: Easy to grow, cheerful, and great for companion planting.
- Cosmos: Tall, airy, and beautiful.
- Snapdragons & Petunias: Can be a bit more challenging from seed but very rewarding.
- Nasturtiums: Edible flowers and leaves, great for containers.
Here’s a little table of some easy-to-start seeds for beginners:
| Plant Type | Why It’s Easy | Tips for Success |
|---|---|---|
| Lettuce | Quick to sprout, grows fast. | Keep soil moist, don’t bury seeds too deep. |
| Basil | Loves warmth, vigorous growth. | Needs plenty of light, don’t let it get cold. |
| Marigolds | Reliable germination, hardy. | Plant shallowly, keep consistently moist. |
| Zinnias | Fast growing, beautiful blooms. | Give them good light, don’t overwater. |
| Bush Beans | Large seeds, strong sprouts. | Plant directly in larger pots, avoid disturbing roots. |
| Peas | Large seeds, quick to emerge. | Can be started in toilet paper rolls. |
Sustainable Seed Starting: Eco-Friendly Choices
At Seedling Sage, we believe in nurturing the love for the earth. Sustainable practices are at the heart of everything we do, and your seed starting station is a perfect place to embrace them!
- Reuse, Reduce, Recycle:
- Instead of buying new plastic seed trays every year, clean and reuse your old ones.
- Get creative with recycled containers from your kitchen – yogurt cups, milk jugs, berry clamshells. Just make sure to add drainage!
- Consider soil blocks to eliminate plastic entirely.
- DIY Seed Starting Mix: If you’re feeling adventurous, you can make your own seed starting mix using ingredients like coir, perlite, and compost. This gives you control over the ingredients and can be more cost-effective.
- Compost Plant Waste: Any thinned seedlings, spent plants, or leftover seed starting mix can go into your compost bin, returning valuable nutrients to the earth.
- Save Your Own Seeds: Once you’ve successfully grown a plant, learn how to save its seeds for next year! This closes the loop, reduces reliance on commercial seed companies, and connects you even more deeply to your garden. It’s a truly rewarding step in sustainable living.
My Journey: A Personal Touch
I remember one spring, I was so excited to start some heirloom tomato seeds. I had read all the instructions, set up my lights, and had my little seedlings thriving. Then, life got busy. I went away for a long weekend, forgetting to set up my automatic watering system. When I came back, my beautiful, vibrant tomato seedlings were drooping, their leaves crisp. My heart sank.
I thought they were gone for good. But I decided to give them a shot. I bottom-watered them carefully, gave them a gentle mist, and hoped. Slowly, over the next few days, they perked up. Not all of them made it, but many did, and those resilient plants went on to produce some of the most delicious tomatoes I’ve ever tasted.
That experience taught me two things: First, even experienced gardeners make mistakes! And second, plants are incredibly resilient. Sometimes, all they need is a little bit of consistent care, a lot of patience, and your unwavering belief in their ability to grow. It’s truly about nurturing growth and harvesting wisdom, one tiny seedling at a time.
Cultivating Growth, Harvesting Wisdom
Creating a cozy seed starting station at home is more than just growing plants; it’s about cultivating a deeper connection to nature, fostering a sense of accomplishment, and embracing sustainable living. It’s a journey that teaches patience, observation, and the incredible power of a tiny seed.
Whether you’re dreaming of a balcony overflowing with tropical plants for containers, a patio filled with drought-tolerant container plants, or a shady corner with shade-loving plants for containers, starting your own seeds gives you the freedom and satisfaction to make it happen. You’re not just planting seeds; you’re planting hope, joy, and a little piece of green paradise.
So, gather your supplies, find your cozy corner, and let’s embark on this wonderful journey together. I can’t wait to see what green wonders you’ll bring to life! Share your seed starting adventures with our community – we’re all here to grow, learn, and flourish together! Happy gardening! 💚

0 Comments