I'll never forget the magic of watching my first tiny tomato seedlings emerge from the soil on a cold February morning. Starting seeds indoors transforms winter months into a season of growth and anticipation, giving you a head start on the growing season while nurturing the love for the earth right from your kitchen table.
Starting seeds indoors involves planting seeds in containers within your home 6-10 weeks before the last frost date, allowing plants to develop strong root systems and healthy growth before transplanting outdoors. This method extends your growing season, saves money, and gives you access to varieties you won't find at local nurseries.
Key Takeaways
• Start most seeds 6-10 weeks before your last frost date for optimal transplant timing
• Basic supplies include seed trays, quality seed starting mix, and consistent moisture - grow lights help but aren't always essential
• Plant seeds at twice their diameter depth and maintain 65-75°F soil temperature for best germination
• Provide 14-16 hours of light daily once seedlings emerge to prevent weak, leggy growth
• Gradually acclimate seedlings outdoors through hardening off before permanent transplanting
Quick Answer
Starting seeds indoors gives you a 6-10 week head start on the growing season by germinating seeds in controlled indoor conditions before transplanting outside after frost danger passes. You'll need basic containers, seed starting mix, consistent moisture, and adequate light to successfully grow strong seedlings that will thrive in your garden.
Why Should You Start Growing Seeds Indoors?
Starting seeds indoors extends your growing season significantly and offers garden enthusiasts complete control over their plants' early development. Instead of waiting for warm weather to direct sow seeds, you can begin nurturing your future garden in January or February, giving plants a robust foundation before they face outdoor conditions.
The benefits go far beyond just timing. When you start seeds indoors, you'll save substantial money compared to buying transplants from nurseries. A packet of seeds that costs $3-4 can produce dozens of plants that would cost $30-40 as nursery transplants. You also gain access to unique varieties that local stores rarely carry, opening up a world of heirloom tomatoes, unusual herbs, and specialty vegetables.
Choose indoor seed starting if you:
- Want to grow specific varieties not available as transplants
- Live in areas with short growing seasons
- Enjoy the process of nurturing plants from the beginning
- Want to save money on your garden investment
- Have adequate indoor space and light conditions
I've found that starting seeds indoors also builds confidence as a gardener. There's something deeply satisfying about successfully germinating seeds and watching them develop into healthy transplants. This process teaches you to read plant signals and understand their needs, making you a better gardener overall.
The most common mistake beginners make is starting too many varieties their first year. I recommend beginning with 3-4 easy crops like tomatoes, peppers, and herbs before expanding to more challenging plants.
When Is the Best Time for Starting Seeds Indoors?
The timing for starting seeds indoors depends on your local last frost date and each plant's specific needs. Most vegetables should be started 6-10 weeks before your expected last frost date, but this varies significantly by crop type.[2][6]
January is optimal for cool-season crops like broccoli, cabbage, kale, lettuce, cauliflower, and spinach in most temperate regions. These plants can tolerate light frosts and benefit from early transplanting.[3] Warm-season crops like tomatoes, peppers, and eggplant should be started 6-8 weeks before the last frost date, typically in February or March depending on your location.
Here's my recommended timeline for common crops:
Start in January:
- Broccoli, cabbage, cauliflower (10-12 weeks before last frost)
- Onions and leeks (10-12 weeks)
- Lettuce and spinach (6-8 weeks)
Start in February-March:
- Tomatoes (6-8 weeks before last frost)
- Peppers and eggplant (8-10 weeks)
- Herbs like basil and oregano (6-8 weeks)
Start in March-April:
- Cucumbers and squash (3-4 weeks before last frost)
- Beans (2-3 weeks, only if season is short)
The key decision rule is this: count backwards from your last frost date based on each plant's recommended indoor growing time. If you're unsure of your frost dates, check with your local extension office or use online frost date calculators.
A common edge case occurs when you start seeds too early. Tomato seedlings that spend too long indoors become root-bound and stressed, leading to poor garden performance. It's better to start slightly late than too early.
Essential Supplies for Starting Seeds Indoors Successfully
You don't need expensive equipment to start seeds successfully, but having the right basic supplies makes the difference between thriving seedlings and disappointing results. The core essentials are containers with drainage, quality seed starting mix, and a reliable watering method - everything else enhances your success but isn't strictly required.[2]
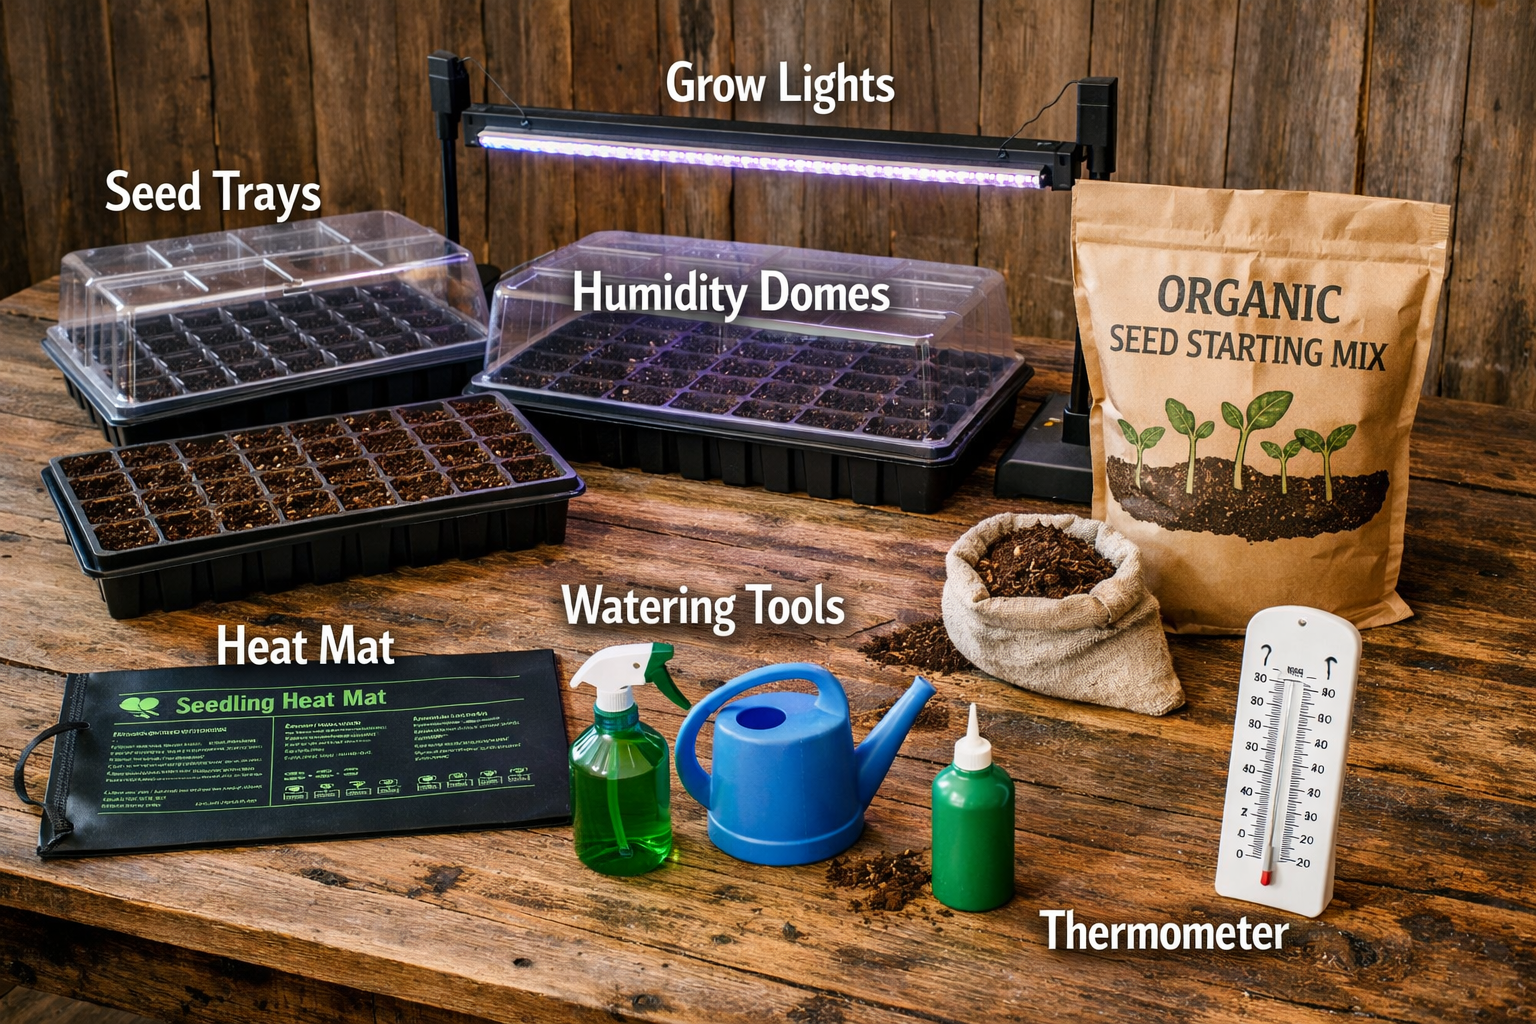
Must-have supplies:
- Seed starting trays or containers - Can be purchased trays, recycled yogurt cups, or egg cartons, as long as they have drainage holes
- Seed starting mix - Different from potting soil; lighter texture prevents damping off disease
- Plant labels - Essential for tracking varieties and planting dates
- Spray bottle or watering can with fine rose - Prevents disturbing tiny seeds
- Humidity dome or plastic wrap - Maintains consistent moisture during germination
Helpful but optional equipment:
- Heat mats - Maintain optimal soil temperature (65-75°F) for faster germination
- Grow lights - Provide consistent light when natural light is insufficient
- Timer - Automates lighting schedule for 14-16 hours daily
- Thermometer - Monitors soil and air temperature
I've successfully started thousands of seedlings using just recycled containers and a sunny south-facing window. However, investing in a basic seed starting kit with trays and humidity domes does improve your success rate and makes the process more enjoyable.
Choose recycled containers if you're: testing your interest in seed starting, working with a tight budget, or starting just a few plants. Invest in proper equipment if you're: planning to start many plants, want consistent results, or lack adequate natural light.
The most critical supply is quality seed starting mix. Regular potting soil is too heavy and retains too much moisture, leading to fungal problems. Seed starting mixes are formulated to provide proper drainage while maintaining adequate moisture for germination.
For more detailed guidance on setting up your space, check out our perfect seed starting station guide.
Step-by-Step Process for Starting Seeds Indoors
Starting seeds indoors follows a straightforward process, but attention to detail in each step determines your success rate. The basic sequence is: prepare containers, plant seeds at proper depth, maintain consistent moisture and temperature, then provide adequate light once seedlings emerge.
Step 1: Prepare Your Containers
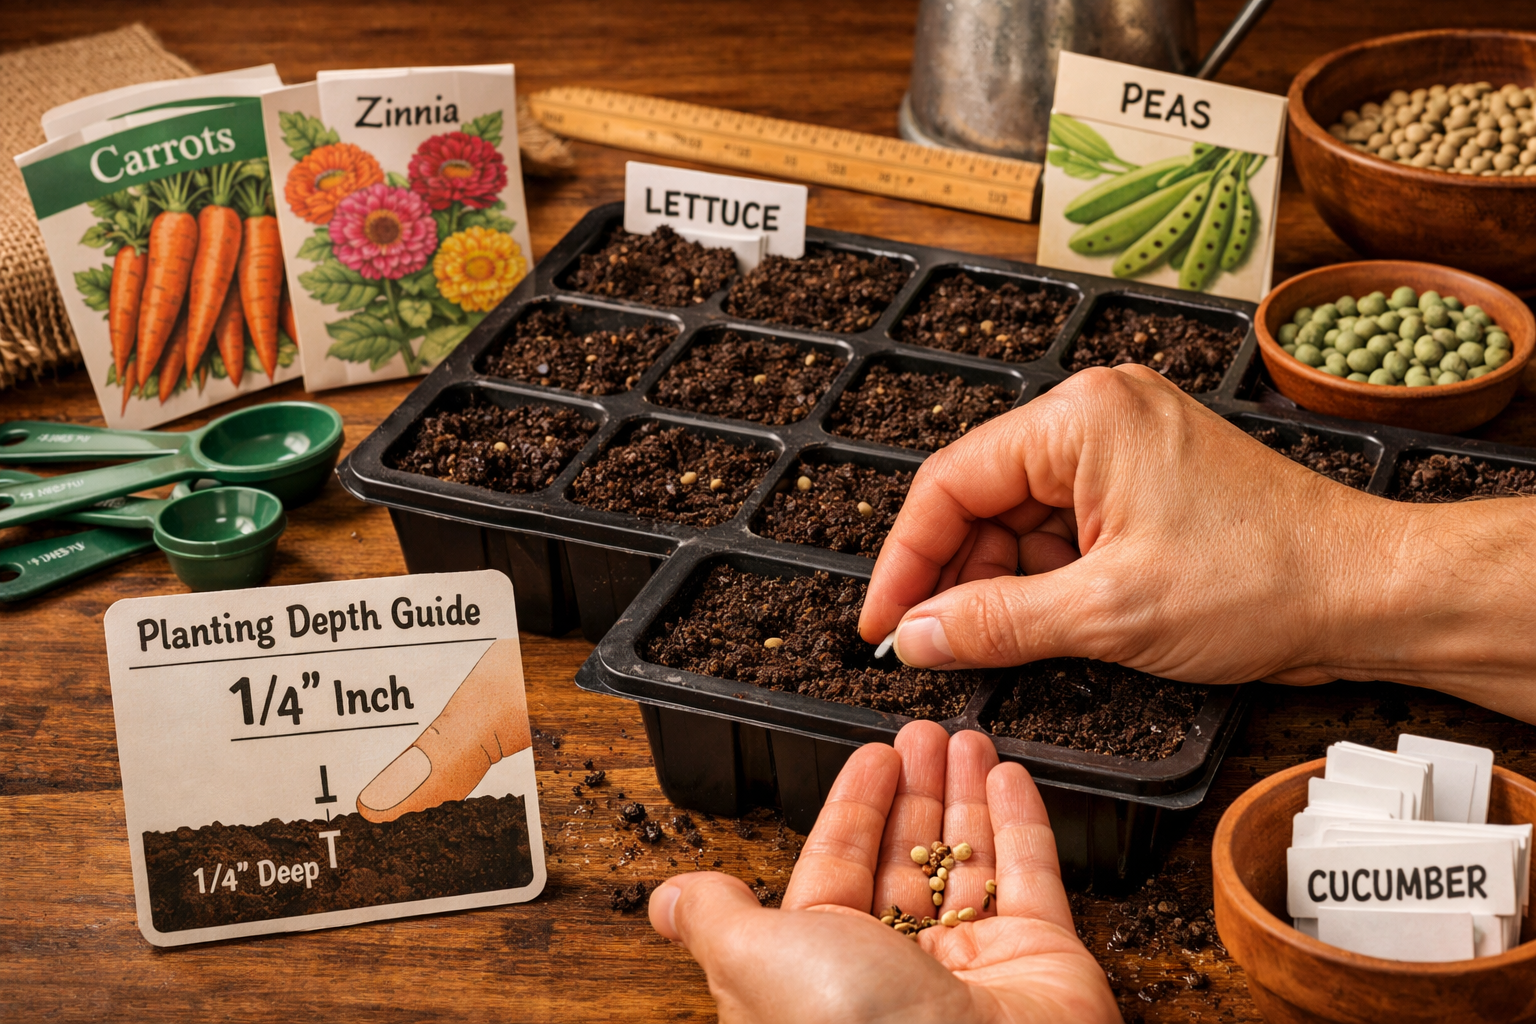
Fill seed starting trays or containers with moistened seed starting mix, leaving about ¼ inch of space at the top. The soil should be damp but not soggy - it should hold together when squeezed but crumble when poked.
Step 2: Plant Your Seeds
Plant seeds at a depth twice their diameter - this is the most reliable general rule.[3] Tiny seeds like lettuce barely need covering, while larger seeds like beans go deeper. Place 2-3 seeds per cell to ensure germination, planning to thin to the strongest seedling later.
Step 3: Create Optimal Germination Conditions
Cover containers with humidity domes or plastic wrap to maintain consistent moisture. Place on heat mats or in a warm location (65-75°F soil temperature). Most seeds don't need light to germinate, but they do need consistent warmth and moisture.
Step 4: Monitor and Water Carefully
Check daily for germination and moisture levels. Water from the bottom by placing trays in shallow water, or mist gently from above. The soil should never dry out completely or become waterlogged.
Step 5: Provide Light After Germination
Once seedlings emerge, remove humidity covers and provide 14-16 hours of light daily. If using grow lights, position them 2-3 inches above seedlings and raise as plants grow.
Step 6: Thin and Transplant
When seedlings develop their first true leaves (not the initial seed leaves), thin to one plant per cell by cutting extras at soil level. Transplant to larger containers if seedlings will be indoors more than 6-8 weeks.
Common mistake to avoid: Overwatering kills more seedlings than underwatering. The soil should be consistently moist but never soggy. If you see white fuzzy growth on the soil surface, you're watering too much or have poor air circulation.
Edge case consideration: Some seeds like dill, snapdragon, and lettuce need light to germinate and should be barely covered or left on the soil surface.[3]
For specific guidance on reading seed packets for timing and depth information, see our complete guide to decoding seed packets.
Lighting Requirements: Do You Really Need Grow Lights?
Grow lights aren't absolutely necessary for starting seeds indoors, but they provide the most consistent and reliable results, especially during winter months when natural daylight is limited. A bright south-facing window can work for many crops, but grow lights give you complete control over light duration and intensity.[2]
Natural light works when you have:
- South-facing windows with 6+ hours of direct sun
- No obstructions (trees, buildings, overhangs)
- Ability to rotate plants regularly for even growth
- Crops that tolerate lower light levels (lettuce, herbs, cool-season vegetables)
Invest in grow lights if you:
- Lack adequate south-facing windows
- Live in northern climates with limited winter sun
- Want to start warm-season crops early (tomatoes, peppers)
- Notice seedlings becoming tall and weak (leggy)
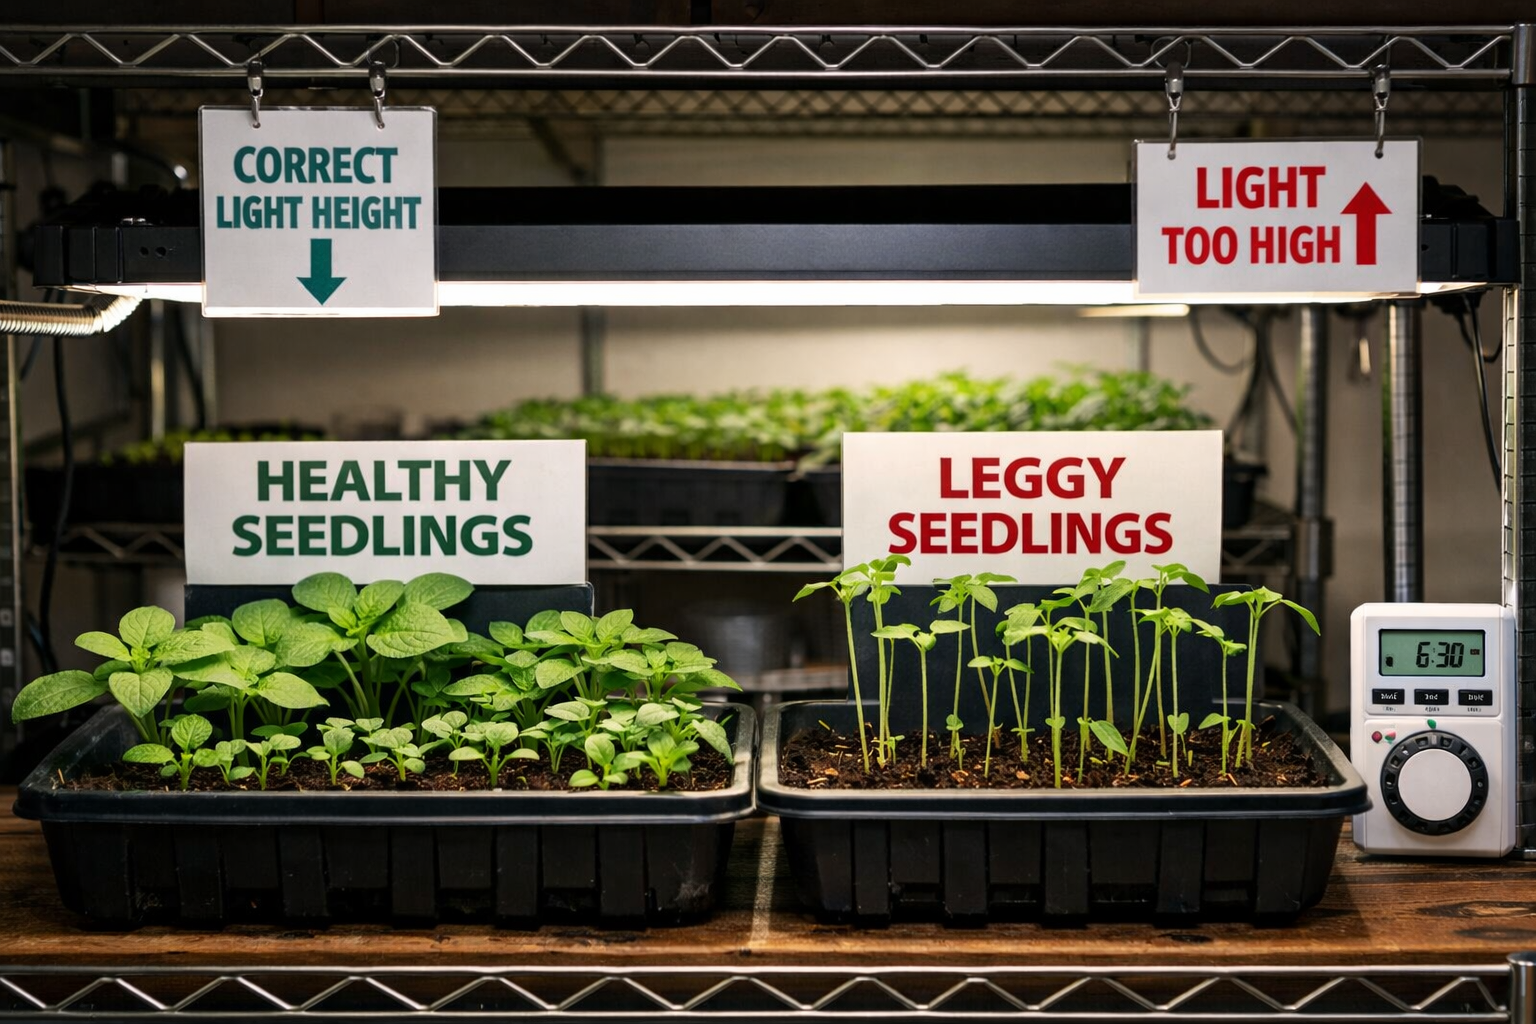
When using grow lights, provide 14-16 hours of light daily and position lights 2-3 inches above seedlings.[2] LED grow lights are the most energy-efficient option and produce less heat than fluorescent or incandescent bulbs. As seedlings grow, gradually raise the lights to maintain the proper distance.
I've seen many beginners place grow lights too far from their seedlings, thinking they're providing adequate light when the intensity is actually too low. The light should be close enough that you can feel slight warmth from the bulbs when you hold your hand at seedling level.
Signs your seedlings need more light:
- Tall, thin stems (legginess)
- Pale green or yellowish color
- Reaching or leaning toward light sources
- Large gaps between leaf nodes
Signs you're providing too much light:
- Leaf edges turning brown or crispy
- Stunted growth despite adequate water and nutrients
- Soil drying out extremely quickly
For most home gardeners, a basic LED grow light setup with a timer provides excellent results without a huge investment. The peace of mind and consistent results often justify the cost, especially if you plan to start seeds annually.
Temperature and Humidity Control for Optimal Germination
Soil temperature is often more critical than air temperature for successful seed germination, with most vegetable seeds germinating best when soil temperatures stay consistently between 65-75°F. Heat mats provide bottom heat that warms the soil directly, often improving germination rates by 20-30% and reducing germination time significantly.
Optimal temperature ranges by crop type:
- Cool-season crops (lettuce, broccoli, spinach): 60-70°F
- Warm-season crops (tomatoes, peppers, eggplant): 70-80°F
- Heat-loving crops (basil, okra, melons): 75-85°F
Humidity control during germination prevents seeds from drying out while avoiding fungal problems that plague overly moist conditions. Maintain 80-90% humidity during germination by using humidity domes or plastic wrap, then reduce to 50-60% once seedlings emerge to promote strong stem development and prevent damping off disease.
Recent innovations in 2026 include automated temperature controllers that create multiple heat zones for different plant requirements, allowing you to start cool and warm-season crops simultaneously with optimal conditions for each.[4] These systems use strategic placement of heat mats or heated greenhouse floors to maintain precise temperatures.
Monitor conditions with these tools:
- Soil thermometer to check actual growing medium temperature
- Digital hygrometer for humidity levels
- Min/max thermometer to track temperature fluctuations
Common temperature mistakes:
- Placing seed trays on cold surfaces like concrete floors or metal tables
- Assuming room temperature equals soil temperature
- Not accounting for temperature drops near windows at night
Humidity troubleshooting:
- If condensation completely covers humidity domes, crack them open slightly for air circulation
- If soil surface shows white fuzzy mold, reduce humidity and improve air movement
- If seeds dry out quickly, increase humidity or water more frequently
The goal is consistent conditions rather than perfect conditions. Seeds are remarkably adaptable, but fluctuating temperatures and moisture levels stress them and reduce germination rates.
Common Problems and How to Solve Them
Even experienced gardeners encounter challenges when starting seeds indoors, but most problems have straightforward solutions once you understand the underlying causes. The three most common issues are damping off disease, leggy seedlings, and poor germination rates - all preventable with proper technique.
Damping Off Disease
This fungal condition causes healthy-looking seedlings to suddenly collapse and die at the soil line. Prevent damping off by using sterile seed starting mix, avoiding overwatering, and providing good air circulation.
- Symptoms: Seedlings fall over with dark, pinched stems at soil level
- Prevention: Use fresh seed starting mix, water from below, ensure drainage holes
- Treatment: Remove affected seedlings immediately, improve air circulation, reduce watering frequency
Leggy Seedlings
Tall, weak seedlings with long stems between leaves indicate insufficient light. Provide 14-16 hours of bright light daily and keep light sources close to plants.
- Symptoms: Tall, thin stems; pale color; reaching toward light
- Prevention: Adequate light intensity and duration from germination
- Treatment: Move closer to light source, bury stems deeper when transplanting
Poor Germination Rates
When fewer seeds sprout than expected, the problem usually relates to seed age, temperature, or moisture. Use fresh seeds, maintain proper soil temperature, and keep soil consistently moist but not waterlogged.
- Causes: Old seeds, incorrect temperature, inconsistent moisture, planting too deep
- Solutions: Test seed viability, use heat mats, check soil moisture daily, follow packet depth recommendations
Additional troubleshooting scenarios:
Seeds sprouting then dying: Usually indicates damping off or temperature shock. Ensure consistent conditions and sterile growing medium.
Uneven germination: Some seeds in a tray sprout while others don't, often due to uneven moisture or temperature across the tray. Check for hot or cold spots and adjust accordingly.
Slow growth after germination: Typically caused by insufficient light, cool temperatures, or nutrient-poor growing medium. Address light and temperature first, then consider fertilizing lightly.
Edge case: Some seeds have specific germination requirements that aren't obvious. Peppers often germinate slowly and benefit from extra warmth, while lettuce may not germinate in soil temperatures above 75°F.
The key to troubleshooting is systematic observation. Keep notes on what you're doing and what results you're seeing, so you can adjust your methods for better results next time.
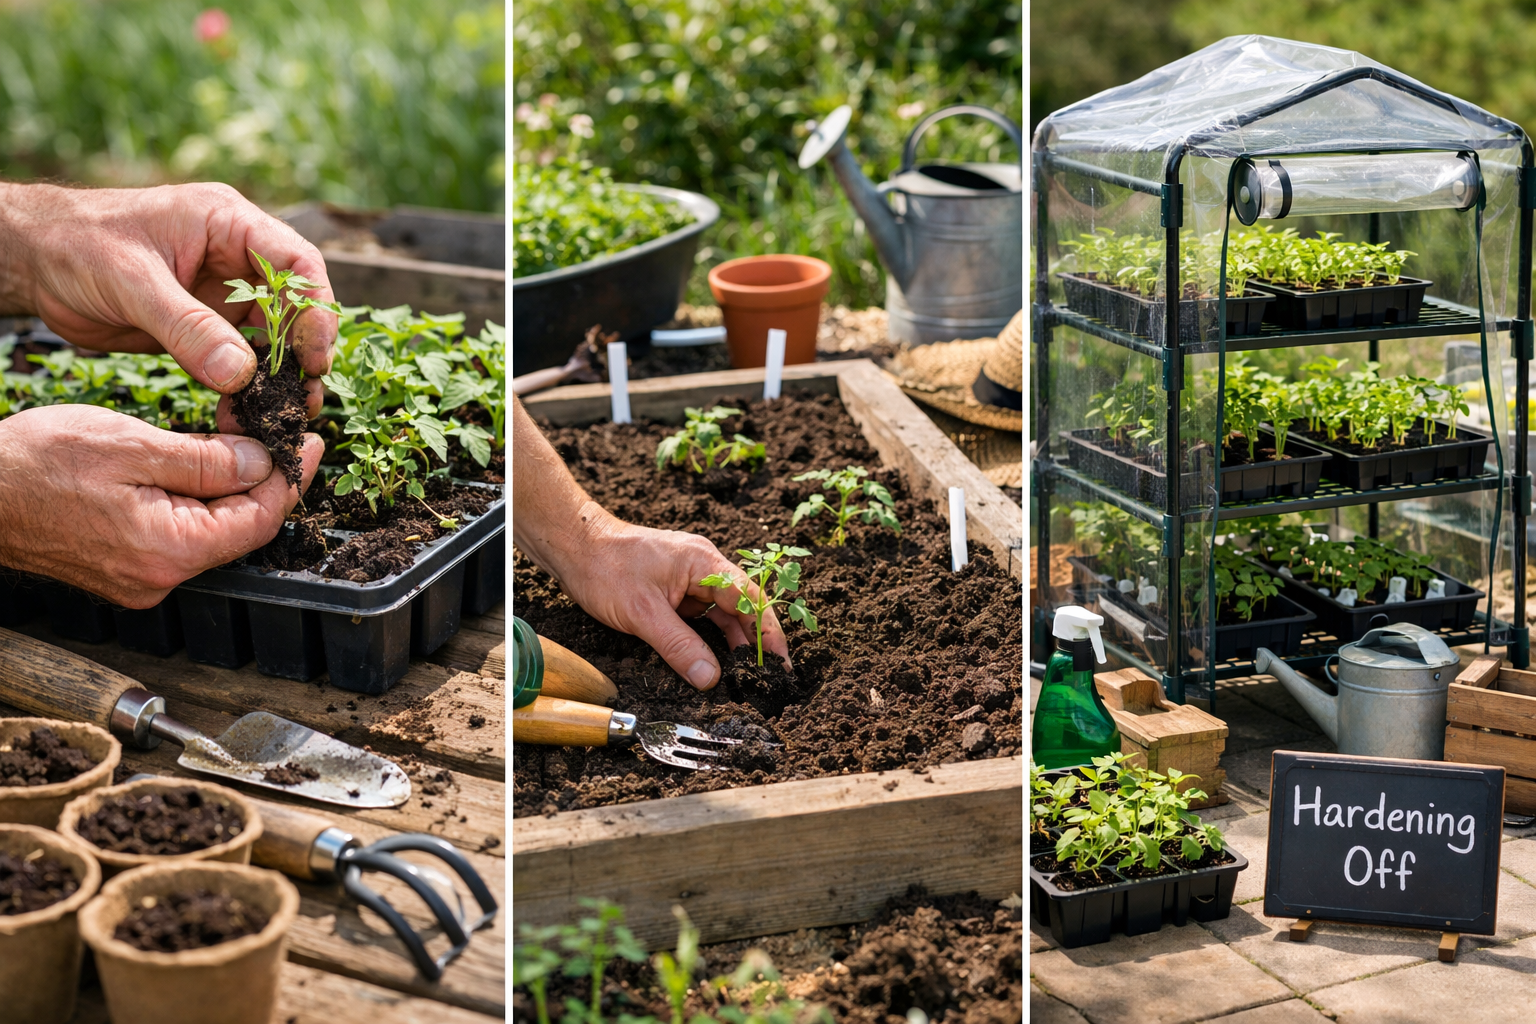
Transplanting and Hardening Off Your Seedlings
Successfully moving seedlings from indoor protection to outdoor garden conditions requires a gradual transition process called hardening off. This acclimatization period typically takes 7-10 days and prevents transplant shock that can set back or kill young plants.
Begin hardening off when:
- Seedlings have developed 2-3 sets of true leaves
- Outdoor temperatures consistently stay above 50°F (for cool-season crops) or 60°F (for warm-season crops)
- You're within 1-2 weeks of your planned transplant date
The hardening off process:
- Days 1-2: Place seedlings outside in shade for 2-3 hours during the warmest part of the day
- Days 3-4: Increase outdoor time to 4-6 hours, still in shade or filtered light
- Days 5-6: Introduce morning sun for 1-2 hours, then shade for remainder of outdoor time
- Days 7-8: Full sun for half the day, shade for the other half
- Days 9-10: Full outdoor conditions all day, bring in only if frost threatens
Transplanting best practices:
- Choose overcast days or evening hours to reduce transplant stress
- Water seedlings thoroughly before and after transplanting
- Dig holes slightly larger than root balls and at the same depth (except tomatoes, which can be planted deeper)
- Handle seedlings by leaves, not stems to avoid damage
For container gardening enthusiasts, the transplanting process is often simpler since you can control soil conditions more precisely. Our container gardening guide covers specific considerations for moving seedlings into containers.
Common transplanting mistakes:
- Rushing the hardening off process due to excitement or impatience
- Transplanting during hot, sunny weather without adequate water
- Planting too early and losing plants to unexpected late frosts
Signs of successful transplanting:
- New growth appears within 1-2 weeks
- Leaves maintain good color and don't wilt excessively
- Plants begin growing larger rather than just surviving
Troubleshooting transplant problems:
- Wilting despite adequate water: Usually transplant shock; provide shade for a few days
- Yellowing leaves: Normal response to stress; remove affected leaves and maintain consistent care
- Stunted growth: May indicate root damage or poor soil conditions in new location
The hardening off period is also an excellent time to observe how your seedlings respond to outdoor conditions and make any final adjustments to your garden plan.
Frequently Asked Questions
How far in advance should I start seeds indoors?
Start most vegetable seeds 6-10 weeks before your last expected frost date. Cool-season crops like broccoli and lettuce can be started 10-12 weeks early, while warm-season crops like tomatoes and peppers need 6-8 weeks. Check seed packets for specific timing recommendations.[2][6]
Can I use regular potting soil for starting seeds?
No, regular potting soil is too heavy and retains too much moisture for seed starting. Use a specific seed starting mix that provides better drainage and reduces the risk of damping off disease. These mixes are formulated to support germination and early seedling development.[3]
Do I need expensive grow lights to start seeds successfully?
Expensive grow lights aren't necessary, but some form of adequate lighting is important. A bright south-facing window can work for many crops, but basic LED grow lights provide more consistent results and prevent leggy seedlings, especially during winter months with limited natural light.[2]
Why are my seedlings tall and weak instead of short and sturdy?
Tall, weak seedlings (called "leggy") indicate insufficient light. Provide 14-16 hours of bright light daily and keep light sources 2-3 inches above seedlings. This problem is more common when relying solely on window light during winter months.[2]
How often should I water seed starting trays?
Check soil moisture daily and water when the surface begins to feel dry but before it completely dries out. Water from the bottom when possible to avoid disturbing seeds, or use a fine mist from above. Consistent moisture is key, but overwatering causes more problems than underwatering.
When should I remove the humidity dome from my seed trays?
Remove humidity domes as soon as you see the first seedlings emerging from the soil. Keeping covers on too long after germination can lead to fungal problems and weak growth. Once removed, focus on providing adequate light and air circulation.
Can I start seeds in egg cartons or yogurt containers?
Yes, any clean container can work for starting seeds as long as it has drainage holes. Egg cartons, yogurt cups, and food containers are all suitable options when properly prepared. Just ensure they're sanitized and have adequate drainage.[3]
What temperature is best for seed germination?
Most vegetable seeds germinate best with soil temperatures between 65-75°F. Cool-season crops prefer the lower end of this range (60-70°F), while warm-season crops like tomatoes and peppers prefer 70-80°F. Soil temperature is more important than air temperature for germination success.
How do I know if my seeds are too old to plant?
Test seed viability by placing 10 seeds on a damp paper towel, folding it over, and keeping it warm for the germination period listed on the packet. If fewer than 7 seeds sprout, the germination rate is too low for reliable results and you should buy fresh seeds.
Should I fertilize seedlings while they're growing indoors?
Most seed starting mixes contain enough nutrients for the first 4-6 weeks of growth. If seedlings will be indoors longer than this, begin light fertilizing with a diluted liquid fertilizer (quarter strength) once they develop their first true leaves.
What's the difference between seed leaves and true leaves?
Seed leaves (cotyledons) are the first leaves that emerge and look different from the plant's normal leaves. True leaves appear next and have the characteristic shape of the mature plant. Wait until plants have 2-3 sets of true leaves before transplanting outdoors.
Can I reuse seed starting trays and containers?
Yes, but clean them thoroughly with a 10% bleach solution between uses to prevent disease transmission. Rinse well after sanitizing and allow to dry completely before storing. Proper sanitation prevents many common seedling problems.
Key Takeaways
• Start planning your indoor seed starting in January for cool-season crops and February-March for warm-season vegetables, counting backwards 6-10 weeks from your last frost date
• Invest in quality seed starting mix rather than regular potting soil to prevent damping off disease and provide optimal growing conditions for germination
• Maintain consistent soil temperature of 65-75°F using heat mats if necessary, as soil temperature is more critical than air temperature for successful germination
• Provide 14-16 hours of light daily once seedlings emerge using grow lights positioned 2-3 inches above plants, or a bright south-facing window with adequate sun exposure
• Water carefully and consistently by checking soil moisture daily and watering from below when possible to avoid disturbing seeds and prevent overwatering
• Plan for a 7-10 day hardening off period before transplanting seedlings outdoors to prevent transplant shock and ensure successful garden establishment
• Start with easy crops like tomatoes, peppers, and herbs in your first year before expanding to more challenging plants, and keep detailed notes for future improvement
• Use any clean containers with drainage holes for seed starting - expensive equipment isn't necessary for success, though it can improve convenience and results
• Remove humidity domes immediately after germination and focus on providing adequate light and air circulation to prevent fungal problems and promote strong growth
Starting seeds indoors opens up a world of gardening possibilities while extending your growing season and connecting you more deeply with the joy of nurturing nature. Whether you're growing in containers on a patio or planning a large garden, the skills you develop through indoor seed starting will serve you well throughout your gardening journey.
The process becomes more intuitive with each season, and you'll find yourself looking forward to those first signs of germination each winter. Remember that every experienced gardener started as a beginner, and each season brings new opportunities to grow, learn, and flourish in your understanding of plants and sustainable living.
For container gardening enthusiasts, starting your own seedlings gives you complete control over plant varieties and growing conditions. Check out our comprehensive container gardening resources to learn how to successfully grow your seedlings in containers throughout the season.
Take the first step this season - choose 2-3 crops you're excited to grow, gather your basic supplies, and experience the satisfaction of nurturing plants from seed to harvest. Your future self will thank you for the actionable insights you gain and the deeper connection to sustainable living that comes from growing your own food.
References
[1] The No Brainer Guide To Starting Seeds Indoors - https://gardenbetty.com/the-no-brainer-guide-to-starting-seeds-indoors/
[2] Seed Starting 101 What You Can Start Indoors Right Now - https://16acresgardencenter.com/2026/01/08/seed-starting-101-what-you-can-start-indoors-right-now/
[3] Starting Seeds Indoors Begin Your Garden In January - https://site.extension.uga.edu/dekalb/2026/01/starting-seeds-indoors-begin-your-garden-in-january/
[4] 2026 Annual Seed Starting Plan A More Disciplined Approach - https://everchanginggarden.ca/2026-annual-seed-starting-plan-a-more-disciplined-approach/
[5] Watch - https://www.youtube.com/watch?v=UtbonBgnEd4
[6] Video When To Start Seeds - https://www.susansinthegarden.com/2026/01/video-when-to-start-seeds/
[7] Starting Seeds Indoors - https://extension.umn.edu/planting-and-growing-guides/starting-seeds-indoors

0 Comments