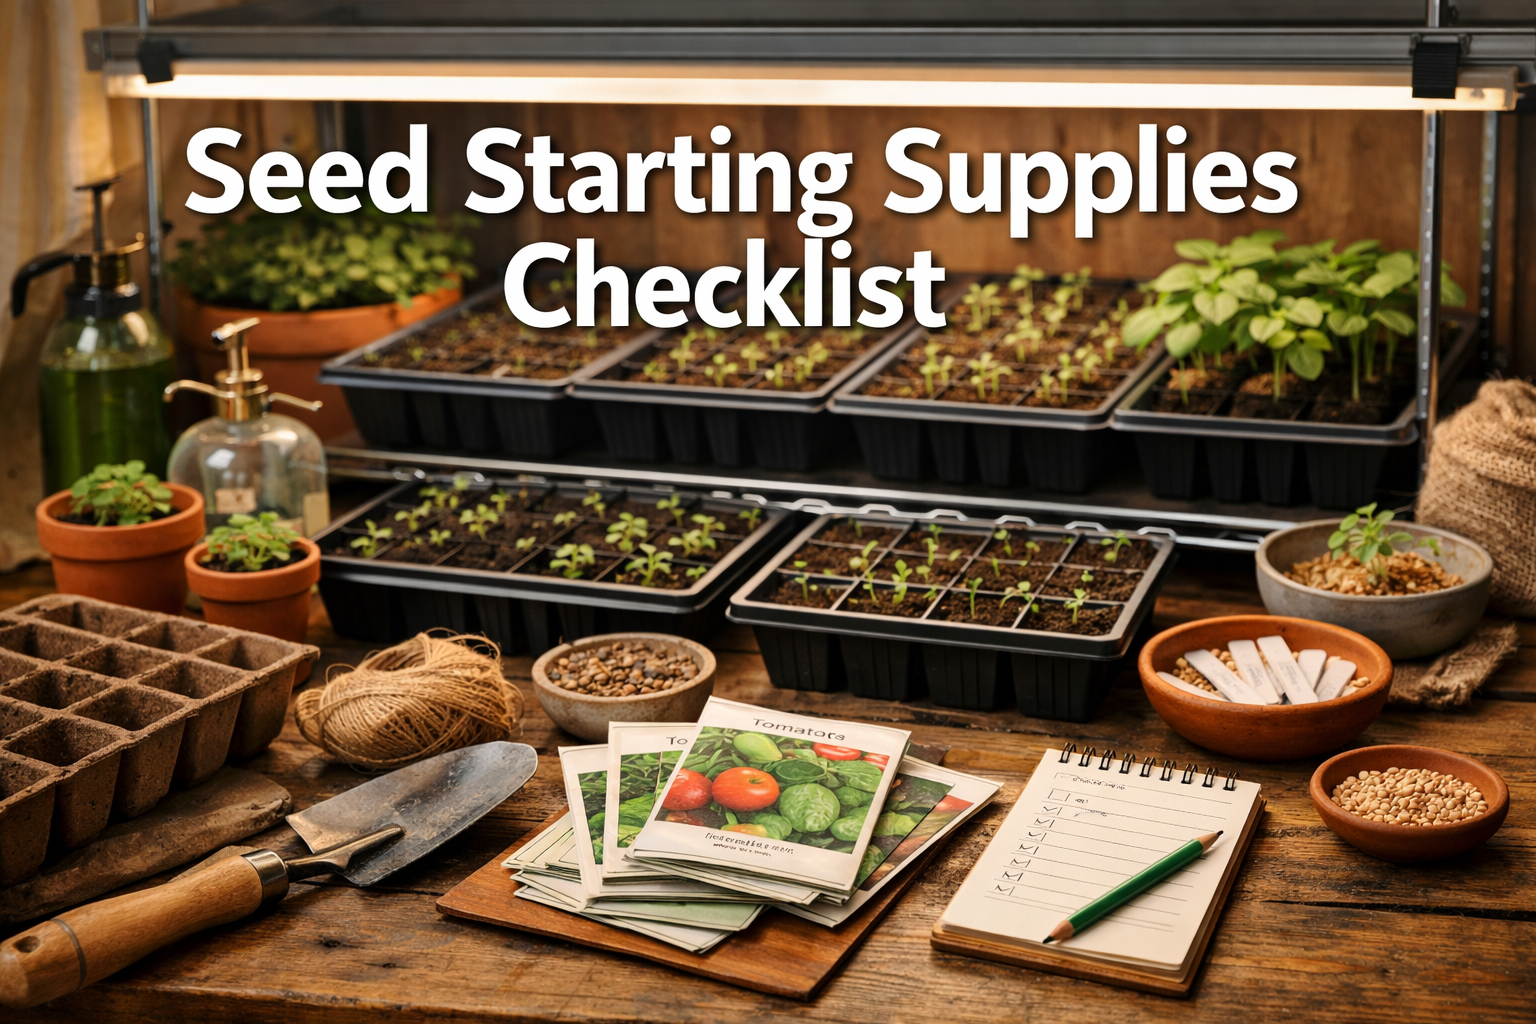
Picture this: it's late winter, snow's still on the ground, but you're already nurturing tiny green miracles on your windowsill. That's the magic of starting seeds indoors! I've been helping fellow garden enthusiasts transform their small spaces into productive growing areas, and I can tell you that having the right seed starting supplies checklist makes all the difference between thriving seedlings and disappointing failures.
Key Takeaways
• Essential supplies include: quality seed starting mix, trays with cells, grow lights, labels, and a watering system
• Skip the garden soil: Use specialized seed starting mix that's light, fluffy, and designed for germination
• Invest in reusable supplies: Quality trays, lights, and tools will serve you for many growing seasons
• Timing matters: Start gathering supplies 6-8 weeks before your last frost date
• Budget wisely: You can start with basics for $50-100 and expand your setup over time
Quick Answer
A complete seed starting supplies checklist includes seven essential items: quality seeds, seed starting mix, seed trays with cells, plant labels, grow lights, a watering system, and a germination plan[2]. The most critical elements are proper seed starting soil (not garden dirt), adequate lighting for 16 hours daily, and containers that allow for easy transplanting. You can start with a basic setup for under $100 and expand as your gardening confidence grows.
What Makes a Seed Starting Supplies Checklist Essential for Success?
Having a comprehensive seed starting supplies checklist prevents the frustrating "oops, I forgot that!" moments that can derail your growing season. I've learned this the hard way – nothing's worse than having perfect germination conditions but no way to water your seedlings properly, or beautiful sprouts that you can't identify because you skipped the labels.
The key is understanding that seed starting is different from regular gardening. Your seedlings need specific conditions that regular houseplants don't require. They're more delicate, need consistent moisture, and require stronger light than what most homes naturally provide.
Here's what separates successful seed starters from frustrated beginners:
- Proper planning: Knowing what you need before you start prevents mid-season scrambling
- Quality over quantity: A few good supplies beat many cheap ones that fail when you need them most
- Understanding timing: Different seeds have different needs, and your supplies should accommodate that variety
- Sustainable choices: Investing in reusable supplies saves money and reduces waste over multiple seasons
When you're nurturing the love for the earth through seed starting, having the right tools makes the journey joyful rather than stressful. Let's dive into exactly what belongs on your seed starting supplies checklist.
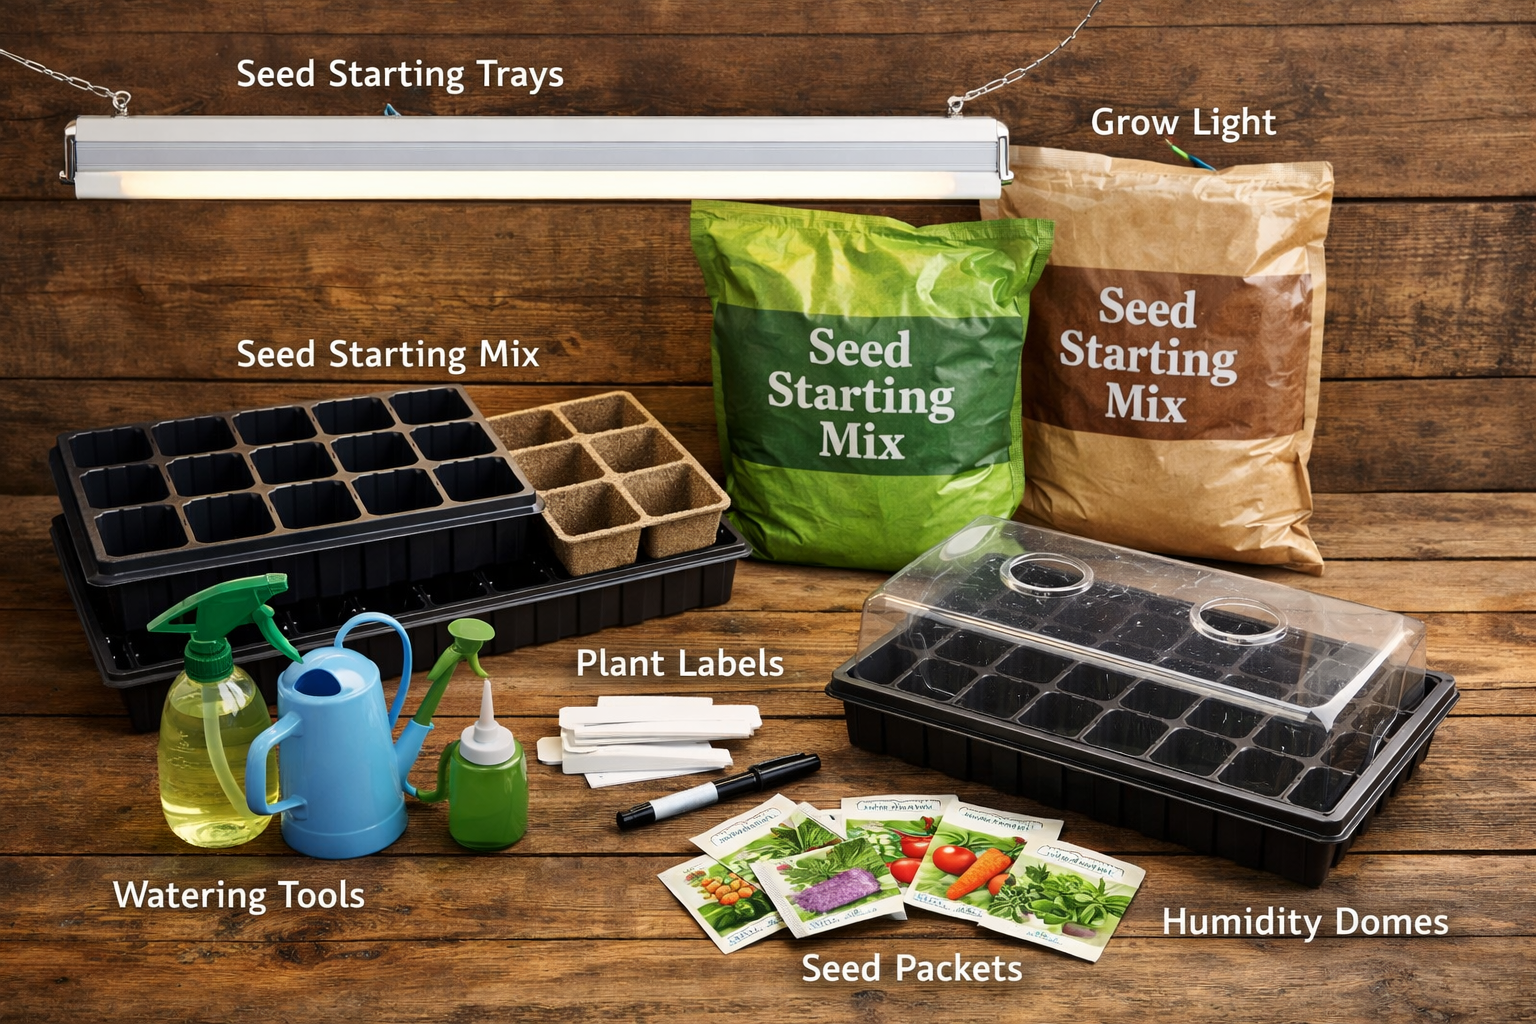
Essential Seed Starting Supplies Checklist: The Must-Haves
These seven items form the foundation of any successful seed starting operation, whether you're working with a sunny windowsill or a dedicated grow room[2].
Seeds (Obviously, But Choose Wisely!)
Start with varieties that are beginner-friendly and suited for container growing. I always recommend checking out our guide to picking perfect seeds for container gardens before making your selections.
Best beginner seeds include:
- Lettuce and leafy greens (quick germination)
- Tomatoes and peppers (long growing season makes early starts worthwhile)
- Herbs like basil and oregano (compact and productive)
- Flowers like marigolds and zinnias (forgiving and colorful)
Seed Starting Mix (Not Regular Potting Soil!)
This is where many beginners go wrong. Regular potting soil or garden dirt is too heavy for tiny seeds[4][5]. You need a specialized mix that's light, fluffy, and drains well while holding moisture.
Look for mixes containing:
- Peat moss or coconut coir
- Vermiculite or perlite for drainage
- A small amount of compost for gentle nutrition
Pro tip: I use a blend of 70% seed starting soil, 20% organic potting soil, and 10% worm castings[1]. This gives seedlings the perfect balance of drainage and nutrition as they develop.
Seed Trays and Cells
The industry standard is 1020 trays (10" x 20") with removable cell inserts[1][3]. These give you flexibility and make transplanting much easier than individual pots.
Cell size options:
- 128-cell trays: Perfect for small seeds like lettuce and herbs
- 72-cell trays: Great all-purpose size for most vegetables
- 50-cell trays: Ideal for larger seeds like beans and squash
- 32-cell trays: Best for plants that need more root space early on
Always use trays with drainage holes and pair them with solid bottom trays to catch excess water.
Plant Labels
Trust me on this – you think you'll remember what you planted where, but you won't! I use plastic plant markers that I can write on with permanent marker and reuse season after season.
Label information to include:
- Plant variety name
- Date planted
- Expected germination time
- Transplant date
Grow Lights
Unless you have a perfect south-facing window, you'll need supplemental lighting. Seedlings need 16 hours of bright light daily[3], which most homes can't provide naturally.
LED grow lights are your best bet because they:
- Run cool (won't overheat seedlings)
- Use less electricity
- Last for years
- Provide the full spectrum plants need
Watering System
Seedlings need consistent moisture but hate being waterlogged. I prefer bottom-watering using the solid trays underneath the cell trays. This prevents disturbing tiny seeds and encourages strong root development.
Watering tools you'll need:
- Spray bottle for initial germination
- Small watering can with a fine rose
- Turkey baster or squeeze bottle for precision watering
A Germination Plan
This isn't a physical supply, but it's absolutely essential. Know when to start each type of seed based on your last frost date and the plant's specific needs. Our guide to decoding seed packets will help you create the perfect timeline.
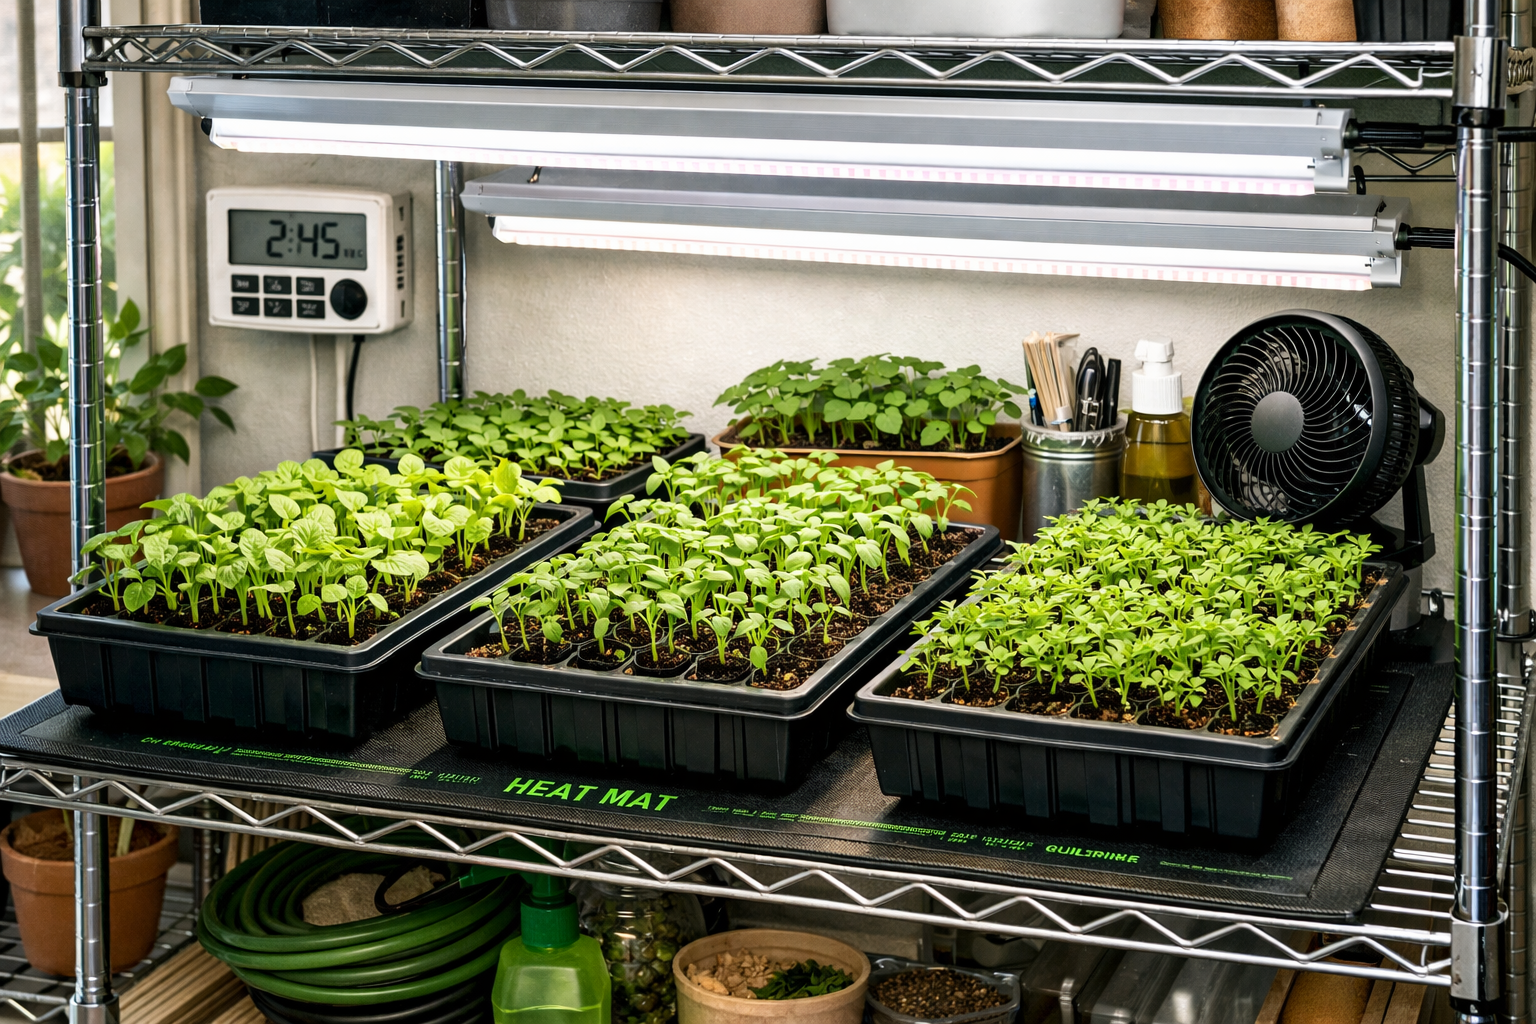
Advanced Seed Starting Supplies Checklist for Serious Growers
Once you've mastered the basics, these additional supplies can take your seed starting game to the next level and help you grow, learn, and flourish as a gardener.
Heat Mats for Faster Germination
Seedling heat mats maintain soil temperature between 70-80°F, which dramatically improves germination rates for warm-season crops[3]. They're especially helpful if you're starting seeds in a cool basement or unheated room.
When to use heat mats:
- Tomatoes, peppers, and eggplants
- Herbs like basil and oregano
- Any seeds that prefer warm soil for germination
Humidity Domes
These clear plastic covers create a mini greenhouse effect that keeps moisture levels consistent during the critical germination period[1]. Remove them once seedlings emerge to prevent fungal issues.
Circulation Fans
Small fans prevent fungal diseases and strengthen seedling stems by providing gentle air movement[3]. I run mine for a few hours each day once seedlings have their first true leaves.
Timers for Automation
Automatic timers for your grow lights ensure consistent lighting schedules even when life gets busy. Set them for 16 hours on, 8 hours off, and your seedlings will thrive.
Specialized Tools
Fiskars multi-tool trowel: Makes transplanting easier and reduces root damage[3]
Soil thermometer: Helps you monitor soil temperature for optimal germination
pH testing kit: Ensures your seed starting mix is in the ideal 6.0-7.0 range
Shelving Systems
As your seed starting operation grows, dedicated shelving helps you organize multiple trays and maximize your growing space. Look for adjustable wire shelving that accommodates different light fixtures.
Budget-Friendly Seed Starting Supplies Checklist Options
Starting your gardening journey doesn't have to break the bank. Here's how to build a functional setup while nurturing your love for sustainable living without overspending.
DIY and Repurposed Options
Containers: Clean yogurt cups, egg cartons, and takeout containers work for small-scale starting
Labels: Cut up plastic containers and write with permanent marker
Humidity covers: Clear plastic food containers or plastic wrap over trays
Bottom trays: Aluminum baking pans or shallow storage containers
Budget-Conscious Buying Strategy
- Start small: Begin with one or two seed types to learn the process
- Buy quality lights first: This is where cheap options really show their limitations
- Invest in good soil: Poor germination rates cost more than premium seed starting mix
- Choose reusable supplies: Spend more upfront for items you'll use for years
Seasonal Shopping Tips
- End-of-season sales: Buy supplies in late summer when garden centers clear inventory
- Online bulk buying: Purchase seed starting mix and trays in larger quantities
- Tool sharing: Consider splitting larger purchases with gardening friends
- Gradual building: Add one or two premium items each season
Common Mistakes When Building Your Seed Starting Supplies Checklist
I've made plenty of mistakes over the years, and I see new gardeners repeat the same ones. Here's how to avoid the most common pitfalls that can turn your green paradise dreams into frustration.
Using the Wrong Soil
The mistake: Grabbing regular potting soil or garden dirt for seed starting
Why it fails: Heavy soils prevent tiny roots from developing and often stay too wet
The fix: Always use specialized seed starting mix or make your own blend[4][5]
Inadequate Lighting
The mistake: Thinking a sunny window is enough for all seedlings
Why it fails: Most homes don't provide 16 hours of bright light daily
The fix: Invest in proper grow lights from the start rather than struggling with weak, leggy seedlings
Overcomplicating the Setup
The mistake: Buying every gadget and supply available
Why it fails: Complex systems are harder to manage and more likely to fail
The fix: Master the basics first, then gradually add advanced supplies
Poor Planning
The mistake: Starting seeds without knowing when to transplant them
Why it fails: Seedlings outgrow their containers or aren't ready when weather permits transplanting
The fix: Create a planting calendar based on your local frost dates and each plant's specific timing needs
Skipping Labels
The mistake: "I'll remember what I planted where"
Why it fails: Everything looks the same when it's just sprouting
The fix: Label everything immediately, including variety and date planted
Setting Up Your Perfect Seed Starting Station
Creating an efficient workspace makes the daily care of your seedlings much more enjoyable. Here's how to organize your supplies for maximum success and minimum frustration.
Location Considerations
Ideal spots for seed starting:
- Spare bedroom with south-facing window
- Basement area with artificial lighting
- Kitchen counter near a sink
- Heated garage or sunroom
What to avoid:
- Areas with temperature fluctuations
- Spaces where pets might disturb trays
- Locations without easy access to water
- Rooms that get too hot or cold
For more detailed setup guidance, check out our complete guide to creating the perfect seed starting station.
Organization Tips
Vertical space: Use shelving to maximize growing area in small spaces
Supply storage: Keep extra soil, labels, and tools in clearly marked containers
Water access: Position your setup near a sink or have watering supplies easily accessible
Record keeping: Keep a notebook or app to track germination rates and timing
Maintenance Schedule
Daily: Check soil moisture and adjust watering as needed
Weekly: Rotate trays for even light exposure, check for pest issues
Bi-weekly: Apply diluted liquid fertilizer once true leaves appear
Monthly: Clean and sanitize any empty trays for reuse
Seasonal Seed Starting Supplies Checklist Planning
Successful seed starting requires thinking ahead and preparing supplies well before you need them. Here's how to plan your purchases and preparations throughout the year.
Winter Preparation (December-January)
- Inventory last year's supplies: Check what needs replacing or cleaning
- Order seeds: Popular varieties sell out, so order early
- Test equipment: Make sure grow lights, heat mats, and timers still work
- Plan your garden: Decide what you want to grow and when to start each crop
Early Spring Action (February-March)
- Set up your station: Clean and organize your growing area
- Start cool-season crops: Lettuce, kale, and other cold-hardy plants
- Monitor soil temperature: Use heat mats if needed for warm-season seeds
- Begin hardening off: Prepare early seedlings for outdoor transplanting
Late Spring Transition (April-May)
- Start warm-season crops: Tomatoes, peppers, and summer flowers
- Prepare outdoor beds: While seedlings grow, get garden spaces ready
- Gradual outdoor exposure: Begin hardening off process for tender plants
- Plan succession plantings: Start additional rounds of quick-growing crops
Summer and Fall Planning (June-November)
- Clean and store supplies: Properly maintain equipment for next year[1]
- Start fall crops: Many vegetables can be direct-seeded or started indoors for fall harvest
- Evaluate and improve: Note what worked well and what to change next year
- Take advantage of sales: Stock up on supplies when prices drop
Frequently Asked Questions
How much should I expect to spend on seed starting supplies?
A basic setup costs $50-100, including grow lights, trays, soil, and seeds. You can start smaller for $30-50 if you use some DIY options, or invest $150-200 for a premium setup that will last many years.
Can I reuse seed starting trays and supplies?
Absolutely! Quality plastic trays, grow lights, and tools can last for decades with proper care. Clean trays with a 10% bleach solution between uses to prevent disease transmission[1].
When should I start shopping for seed starting supplies?
Begin gathering supplies 6-8 weeks before you plan to start your first seeds. This gives you time to set up your station and test equipment before you need it.
Do I really need grow lights, or will a sunny window work?
While a bright south-facing window can work for small quantities, most homes don't provide the 16 hours of bright light that seedlings need[3]. Grow lights give you much more reliable results.
What's the difference between seed starting mix and regular potting soil?
Seed starting mix is lighter, finer, and drains better than regular potting soil[4][5]. It's specifically formulated for germination and won't compact around tiny seeds like heavier soils can.
How many seeds can I start with a basic setup?
A standard 1020 tray with 72-cell insert can start 72 plants. Most beginners find 2-4 trays manageable for their first season, giving you space for 144-288 plants.
Should I buy organic seed starting supplies?
Organic supplies aren't necessary for successful germination, but they align with sustainable gardening practices. Focus your organic budget on soil amendments and fertilizers rather than containers and tools.
Can I start seeds without a heat mat?
Yes, but germination may be slower and less reliable for warm-season crops. If your home stays around 70°F, many seeds will germinate fine without supplemental heat.
How long do seed starting supplies last?
Quality supplies can last many years: plastic trays (5-10 years), LED grow lights (10+ years), and tools (decades). Soil amendments and seeds need annual replacement.
What's the most important item on the seed starting supplies checklist?
Proper lighting is crucial – without adequate light, even perfect seeds and soil won't produce strong, healthy seedlings ready for transplanting.
Do I need different supplies for different types of seeds?
The basic supplies work for most seeds, but you might want different cell sizes (smaller for herbs, larger for squash) and heat mats specifically for warm-season crops.
How do I know if my seed starting supplies are working?
Successful germination within expected timeframes, strong green growth, and sturdy stems indicate your setup is working well. Leggy, pale, or slow-growing seedlings suggest adjustments are needed.
Conclusion
Building your seed starting supplies checklist is an investment in years of gardening joy and sustainable living. Start with the seven essentials – quality seeds, proper soil mix, trays with cells, labels, grow lights, watering tools, and a solid plan – then expand your setup as your confidence and space allow.
Remember, the goal isn't to have the most expensive or extensive setup, but to create a system that works reliably in your space and fits your lifestyle. I've seen amazing results from simple setups and frustrating failures from overly complex ones.
Your next steps:
- Assess your space and determine what size setup makes sense for you
- Start with the basics and focus on getting those seven essential items right
- Begin small with 2-3 easy varieties to learn the process
- Plan your timing using our container gardening guide for beginners to create your planting schedule
- Expand gradually as you gain experience and confidence
The joy of nurturing nature from tiny seeds to thriving plants is one of life's most rewarding experiences. With the right supplies and a bit of patience, you'll soon be enjoying the freshest vegetables, most beautiful flowers, and the deep satisfaction that comes from growing your own food.
Whether you're working with a sunny windowsill or dedicating an entire room to your growing operation, having a complete seed starting supplies checklist ensures you're ready to turn those tiny seeds into the green paradise you're dreaming of. Here's to your most successful growing season yet! Don't forget to check out our The Complete Beginner's Guide to Starting Seeds Indoors.
References
[1] Seed Starting 101 - https://homesteadandchill.com/seed-starting-101/
[2] My Indoor Seed Starting Setup 7 Supplies You Need And 10 You Dont - https://resprout.com/my-indoor-seed-starting-setup-7-supplies-you-need-and-10-you-dont/
[3] Seed Starting Supplies - https://gardenbetty.com/seed-starting-supplies/
[4] Seed Starting Supplies - https://www.elmdirt.com/blogs/news/seed-starting-supplies
[5] Seed Starting Supplies Checklist What You Actually Need - https://thewhisperingwillowfarm.com/blogs/blog/seed-starting-supplies-checklist-what-you-actually-need

0 Comments