I'll never forget my first gardening disaster. After weeks of nurturing beautiful tomato seedlings under grow lights, I confidently transplanted them straight into my container garden on a sunny spring day. Within hours, my precious plants looked like wilted lettuce, and half of them never recovered. That painful lesson taught me everything I needed to know about how to harden off seedlings properly—and it's a mistake I'll never make again.
Key Takeaways
- Start the hardening process gradually when seedlings have their first set of true leaves and are 2-3 inches tall
- Follow a 7-10 day timeline beginning with 2-3 hours of protected outdoor exposure and gradually increasing
- Monitor temperature thresholds carefully—never expose seedlings when temps drop below 45°F
- Protect from wind and direct sun initially, then gradually introduce these elements over several days
- Watch for stress signals like wilting, leaf burn, or stunted growth and adjust your schedule accordingly
Quick Answer
Hardening off seedlings properly involves gradually exposing indoor-grown plants to outdoor conditions over 7-10 days before transplanting[1]. Start with 2-3 hours in a sheltered, partially shaded area when temperatures are above 45°F, then slowly increase exposure time and intensity each day until plants can handle full sun, wind, and temperature fluctuations[2].
What Does It Mean to Harden Off Seedlings?
Hardening off is the process of gradually acclimating indoor-grown seedlings to outdoor growing conditions before permanent transplanting[1]. Think of it as plant boot camp—you're training your tender seedlings to handle the real world of fluctuating temperatures, direct sunlight, and natural breezes.
When seedlings grow indoors under controlled conditions, they develop soft, tender tissues that aren't equipped to handle outdoor stress. The controlled environment of your perfect seed starting station creates pampered plants that need time to toughen up.
Why hardening off matters:
- Prevents transplant shock and plant death
- Strengthens stem structure and leaf tissues
- Helps plants adapt to temperature fluctuations
- Reduces stress-related growth delays
- Improves overall plant survival rates
Without proper hardening, even the healthiest seedlings can suffer severe setbacks or die when moved outdoors. I've learned this lesson the hard way, and now I consider hardening off as essential as proper watering or good soil.
When Should You Start Hardening Off Seedlings?
Begin the hardening process when your seedlings are 2-3 inches tall with their first set of true leaves fully developed[1]. This typically occurs 4-6 weeks after germination, depending on the plant variety and growing conditions.
Temperature guidelines for starting:
- Cool-weather crops (lettuce, kale, peas): Wait for nighttime temperatures consistently in the low 50s°F
- Warm-weather plants (tomatoes, peppers, squash): Wait for nighttime temperatures in the high 50s°F to low 60s°F[1]
- Never start when daytime temperatures are below 45°F[2]
Signs your seedlings are ready:
- Strong, sturdy stems that don't bend easily
- Well-developed root systems (you can see roots through drainage holes)
- Healthy green color with no signs of stress
- At least two sets of true leaves beyond the initial seed leaves
I always check the 10-day weather forecast before starting. You want a stretch of mild, stable weather without extreme temperature swings or severe storms. If harsh weather is predicted, I delay the process rather than risk shocking my plants.
The Step-by-Step Guide: How to Harden Off Seedlings Properly
Here's my proven method for gradually transitioning seedlings from indoor comfort to outdoor resilience. This process typically takes 7-10 days, but I adjust the timeline based on weather conditions and how my plants respond.
Pre-Hardening Preparation (Indoor Phase)
Before moving seedlings outdoors, start strengthening them indoors. I gently brush my hand back and forth across the seedlings daily for about a week[1]. This simple technique simulates natural breezes and encourages stronger stem development—it's like giving your plants a gentle workout.
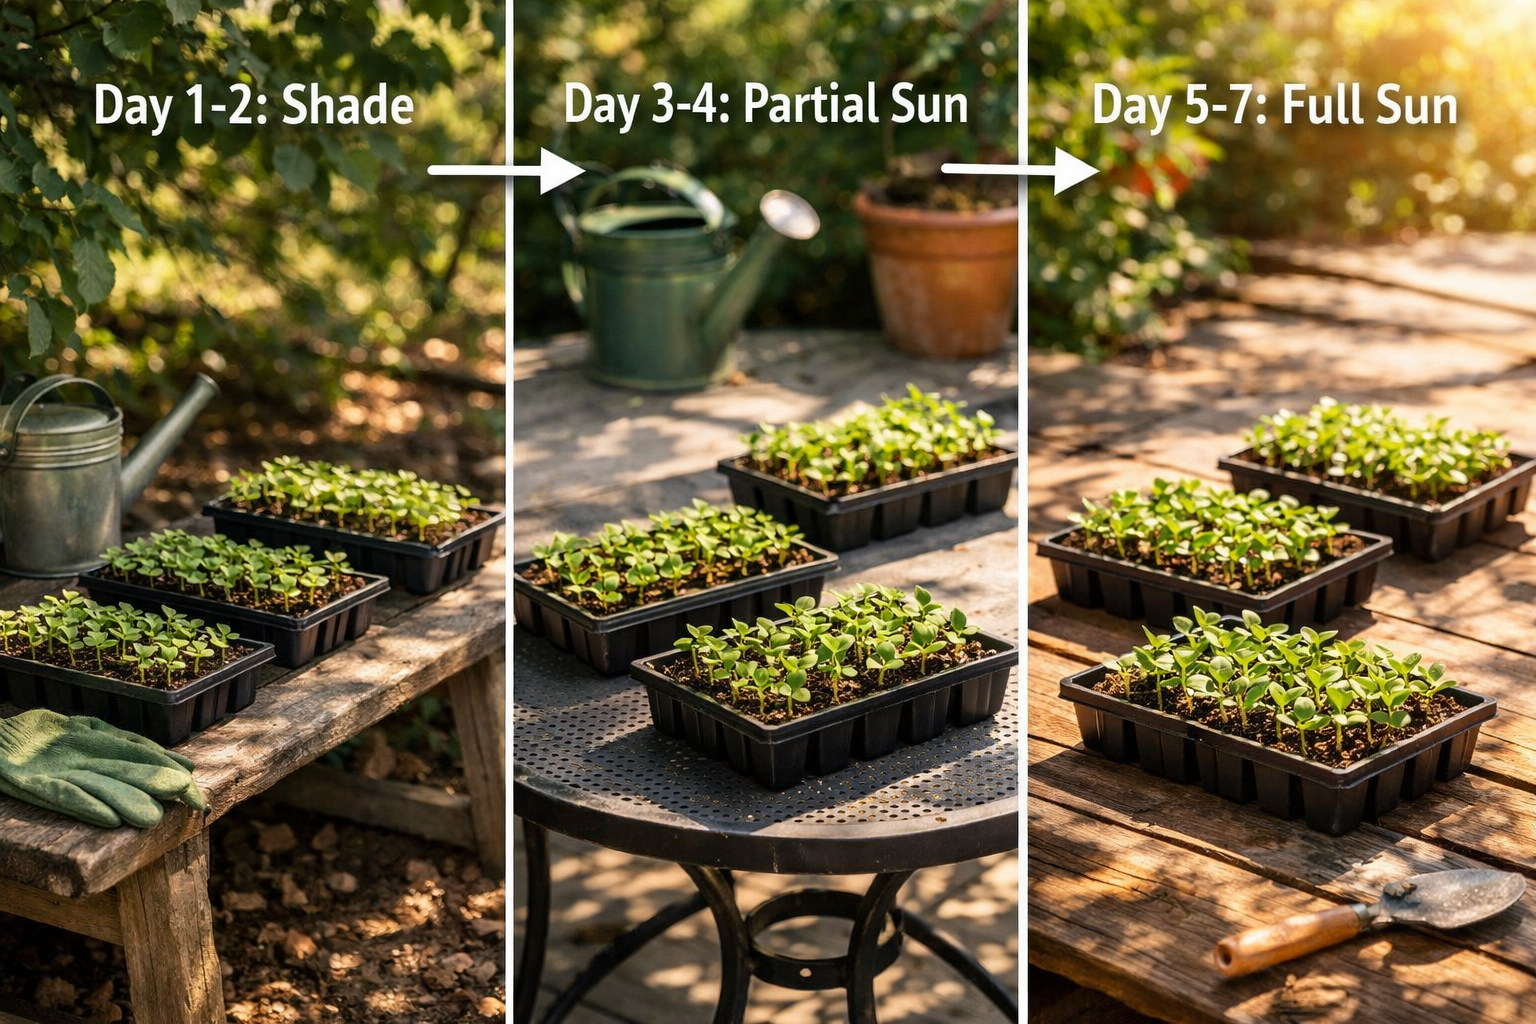
Days 1-2: Gentle Introduction
Exposure time: 2-3 hours in late afternoon
Location: Dappled shade or covered porch
Conditions: Wind-protected area, temperatures above 60°F[1]
Place seedlings in a sheltered spot where they'll receive filtered light but no direct sun. I use my covered patio or under a large tree where they get bright light but protection from harsh rays and wind. Always bring them inside before evening temperatures drop.
Days 3-4: Increasing Sun Exposure
Exposure time: 3-4 hours
Location: Partial to full sun for short periods
Conditions: Light breeze acceptable, still monitoring temperature[1]
Now I introduce some direct sunlight, usually morning sun which is gentler than afternoon rays. If leaves show any signs of wilting or browning, I move them back to shade immediately. This is when you'll really see how your plants are adapting.
Days 5-6: Extended Outdoor Time
Exposure time: 5-6 hours
Location: Full sun for most of the period
Conditions: Normal outdoor breezes, varying light conditions[1]
By this stage, your seedlings should be handling direct sunlight well. I leave mine out for most of the day but still bring them in before evening. Watch for any stress signals—healthy plants should look perky and maintain their green color.
Days 7-10: Full Day Exposure
Exposure time: Full day (sunrise to sunset)
Location: Final planting location if possible
Conditions: All natural outdoor conditions except overnight exposure[1]
During these final days, seedlings experience everything except sleeping outdoors. This is your last chance to identify any plants that aren't adapting well. Strong, properly hardened seedlings will look vibrant and show no signs of stress even after a full day outside.
Common Mistakes When Learning How to Harden Off Seedlings Properly
After years of helping fellow gardeners troubleshoot their transplant troubles, I've noticed several recurring mistakes that can derail the hardening process.
Rushing the Timeline
The mistake: Moving too quickly through the stages because you're excited to get plants in the ground.
The fix: Stick to your schedule even if plants look strong. Each day serves a purpose in building plant resilience.
I've seen gardeners skip from day 2 directly to day 5 because their seedlings "looked fine." This often results in stressed plants that struggle for weeks after transplanting.
Ignoring Weather Conditions
The mistake: Continuing the hardening schedule during unsuitable weather.
The fix: Pause the process during extreme conditions and extend your timeline as needed[2].
If temperatures drop unexpectedly or strong winds develop, keep seedlings indoors that day. It's better to extend the process than risk setbacks.
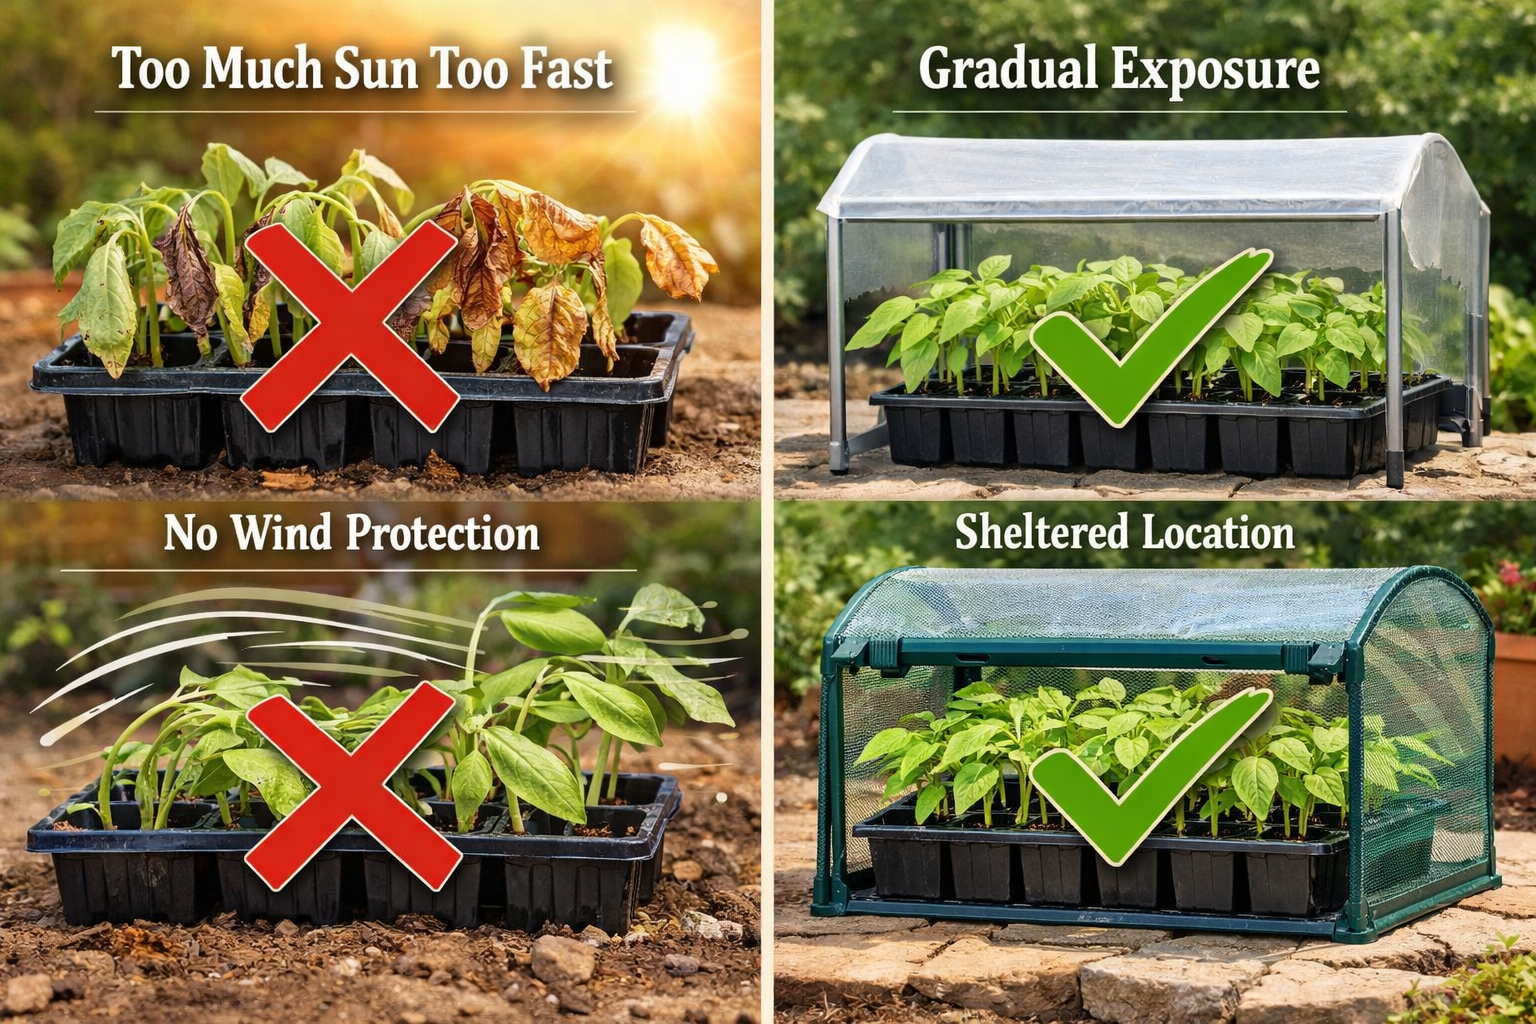
Forgetting About Wind Protection
The mistake: Exposing tender seedlings to strong winds too early.
The fix: Gradually introduce air movement, starting with gentle breezes in protected areas.
Wind can be more damaging than sun for young seedlings. I always choose locations with natural windbreaks during the first few days.
Not Monitoring Individual Plant Response
The mistake: Treating all seedlings the same regardless of their individual adaptation.
The fix: Watch each plant and adjust exposure for slower-adapting varieties.
Some plants, especially those started from different seed batches or varieties, may need extra time. I've learned to be flexible and give struggling plants additional protection when needed.
Alternative Methods for Different Situations
While the standard 7-10 day method works well for most situations, I've discovered some alternative approaches that work better under specific circumstances.
The Cloudy Weather Method
When Mother Nature provides 1-2 weeks of mild, overcast weather, you can transplant seedlings with true leaves directly outdoors[1]. The natural cloud cover acts as a gradual introduction to outdoor conditions. However, this method works best in areas with stable spring weather—not recommended if you live somewhere with dramatic temperature swings.
The Shade Cloth Approach
For seedlings grown exclusively under artificial lights, I sometimes use protective shade cloth for the first 3 days outdoors[3]. This method works particularly well for:
- Delicate herbs like basil and cilantro
- Seedlings that show immediate stress in direct sun
- Areas with intense afternoon sun
Gradually remove the shade cloth over several days while monitoring plant response.
The Young Seedling Fast Track
Interestingly, very young seedlings with just their first true leaves often adapt faster than more mature plants[3]. For these babies, I can sometimes plant them directly with frost blanket protection for a few days rather than full hardening off. This works because they haven't become as accustomed to controlled indoor conditions.
Troubleshooting Common Hardening Off Problems
Even with careful planning, you might encounter challenges during the hardening process. Here's how I handle the most common issues:
Wilting During Exposure
Symptoms: Leaves drooping or looking limp during outdoor time
Solutions:
- Move to shade immediately and provide water
- Reduce exposure time for the next few days
- Check soil moisture—stressed plants need consistent hydration
Leaf Burn or Browning
Symptoms: Brown or white patches on leaves, especially along edges
Solutions:
- This indicates too much sun too quickly
- Return to partial shade for several more days
- Remove damaged leaves to encourage new growth
Stunted Growth
Symptoms: Plants stop growing or new growth appears smaller
Solutions:
- Extend the hardening timeline
- Ensure plants are getting adequate nutrition
- Consider whether temperature fluctuations are too extreme
Purple or Reddish Leaf Color
Symptoms: Leaves developing purple or red tinting
Solutions:
- Often indicates cold stress
- Wait for warmer weather before continuing
- This is common with tomatoes and peppers in cool conditions
Caring for Seedlings During the Hardening Process
Proper care during hardening off is just as important as the exposure schedule itself. I've learned that stressed plants need extra attention to successfully make the transition.
Watering Considerations
Outdoor conditions mean faster moisture evaporation, so I check soil moisture twice daily during hardening. However, I'm careful not to overwater—soggy soil combined with environmental stress can lead to root problems.
My watering strategy:
- Check moisture first thing in the morning
- Water thoroughly if the top inch of soil feels dry
- Avoid watering leaves directly to prevent disease issues
- Use room-temperature water to avoid additional shock
Nutrition Support
I don't fertilize heavily during hardening off, but I do provide gentle nutrition support. A diluted liquid fertilizer (quarter strength) every few days helps plants maintain energy for adaptation. For container gardeners, this is especially important since the best organic soil for container gardening provides good nutrition but may need supplementation during stressful transitions.
Protection Strategies
Always have a backup plan for unexpected weather changes. I keep lightweight row covers, cold frames, or even cardboard boxes handy for emergency protection. It's better to be overly cautious than lose weeks of growing progress.
After Hardening: Transplanting Success
Once your seedlings have completed the hardening process, they're ready for their permanent homes. Whether you're moving them into containers for your patio garden or into garden beds, proper transplanting technique ensures your hardening efforts pay off.
Best practices for transplanting hardened seedlings:
- Choose a cloudy day or transplant in early evening to reduce stress
- Water plants thoroughly before and after transplanting
- Handle root balls gently to avoid damage
- Provide temporary shade for the first day if weather is particularly sunny
- Monitor closely for the first week and provide extra water as needed
For container gardeners, this is an exciting time to implement your container vegetable gardening plans with confidence that your plants are ready to thrive.
Frequently Asked Questions
Q: Can I harden off seedlings in cold frames instead of moving them daily?
A: Yes, cold frames provide excellent controlled hardening environments. Gradually increase ventilation over the same 7-10 day period, starting with just a crack and eventually leaving the frame fully open during warm days[6].
Q: What should I do if the weather turns bad during hardening off?
A: Pause the process and keep seedlings indoors until conditions improve. It's better to extend your timeline than risk plant damage from severe weather[2].
Q: Do all plants need the same hardening schedule?
A: No, cool-weather crops like lettuce and kale can handle cooler temperatures and often need less hardening time than warm-weather plants like tomatoes and peppers[1].
Q: Can I harden off seedlings on a covered porch?
A: A covered porch works well for the initial days, but plants eventually need exposure to direct sunlight and natural air movement to fully adapt[1].
Q: Is it normal for some seedlings to look stressed during hardening?
A: Mild stress responses like slight wilting are normal, but severe wilting, leaf burn, or color changes indicate you need to slow down the process[3].
Q: Can I speed up hardening off with grow lights?
A: Grow lights can't replicate the intensity and spectrum of natural sunlight or provide wind conditioning. There's no substitute for gradual outdoor exposure[4].
Q: What's the minimum temperature for starting hardening off?
A: Never begin hardening when temperatures drop below 45°F, and ensure nighttime temperatures are appropriate for your specific crops[2].
Q: Should I fertilize during the hardening process?
A: Light feeding with diluted fertilizer is fine, but avoid heavy fertilization which can promote soft growth that's more susceptible to outdoor stress[6].
Q: Can I harden off different types of plants together?
A: Yes, but monitor each type individually as they may have different tolerance levels and adaptation rates[1].
Q: What if I don't have time for a full 7-10 day hardening schedule?
A: You can compress the timeline slightly in ideal weather conditions, but don't skip the process entirely. Even 4-5 days of gradual exposure is better than direct transplanting[3].
Conclusion
Learning how to harden off seedlings properly has transformed my gardening success and can do the same for yours. This simple but crucial process bridges the gap between your indoor seed starting efforts and thriving outdoor plants. By following the gradual 7-10 day timeline, monitoring your plants' responses, and adjusting for weather conditions, you'll give your seedlings the best possible start in their permanent homes.
Remember, hardening off is about patience and observation. Each day serves a purpose in building your plants' resilience, and rushing the process often leads to setbacks that cost more time than the gradual approach. Whether you're growing herbs in containers or planning a full organic vegetable container garden, properly hardened seedlings will reward your efforts with vigorous growth and better harvests.
Your next steps:
- Check your current seedlings and assess their readiness for hardening
- Monitor the weather forecast for a suitable 10-day window
- Prepare your hardening locations and backup protection materials
- Start with the gentle indoor preparation phase
- Follow the daily progression while staying flexible based on plant response
The joy of nurturing nature from seed to harvest is one of gardening's greatest rewards. By mastering this essential skill, you're setting yourself up for seasons of successful growing and the satisfaction that comes from truly understanding your plants' needs. Trust the process, watch your plants closely, and enjoy seeing them grow strong and resilient under your care. You can take a look at The Complete Beginner's Guide to Starting Seeds Indoors.
References
[1] How To Harden Off Your Seedlings - https://gardenbetty.com/how-to-harden-off-your-seedlings/
[2] Hardening Vegetable Seedlings Home Garden - https://extension.umd.edu/resource/hardening-vegetable-seedlings-home-garden
[3] Hardening Off Plants The Easy Way - https://northernhomestead.com/hardening-off-plants-the-easy-way/
[4] How To Harden Off And Transplant Your Seedlings - https://seedsavers.org/how-to-harden-off-and-transplant-your-seedlings/
[5] Setting Plants Success Spring - https://joegardener.com/podcast/setting-plants-success-spring/
[6] Hardening Transplants - https://extension.psu.edu/hardening-transplants/

0 Comments